

Featured image for daizuki air conditioner instructions
Image source: daizuki.com
Daizuki air conditioner instructions simplify setup with clear, step-by-step guidance for quick and hassle-free installation. Perfect for DIYers, this easy-to-follow manual ensures optimal performance and energy efficiency from day one.
Key Takeaways
- Read the manual first: Always start with Daizuki air conditioner instructions for safe setup.
- Check power requirements: Verify voltage compatibility before plugging in your unit.
- Secure window seal: Ensure tight installation to prevent air leaks and inefficiency.
- Use remote correctly: Point directly at the unit for reliable operation.
- Clean filters monthly: Maintain airflow and efficiency with regular filter care.
- Schedule professional maintenance: Annual servicing extends lifespan and performance.
📑 Table of Contents
- Daizuki Air Conditioner Instructions: Easy Setup Guide
- What’s in the Box? Unboxing Your Daizuki Air Conditioner
- Choosing the Right Location for Your Daizuki AC
- Step-by-Step Installation Guide
- Understanding Daizuki Air Conditioner Controls and Settings
- Maintenance Tips to Keep Your Daizuki AC Running Smoothly
- Energy Efficiency and Cost-Saving Tips
- Common Issues and Troubleshooting
- Final Thoughts: Enjoying Your Daizuki Air Conditioner
Daizuki Air Conditioner Instructions: Easy Setup Guide
So, you’ve just unboxed your brand-new Daizuki air conditioner—congratulations! Whether you’re trying to beat the summer heat or keep your home cozy during unexpected warm spells, you’ve made a smart investment. But let’s be honest: the moment you see that instruction manual, a tiny wave of panic might hit. All those diagrams, technical terms, and steps can feel overwhelming, especially if you’re not exactly a DIY expert. I’ve been there. I remember staring at my first AC unit like it was a puzzle from another planet. But here’s the good news: setting up a Daizuki air conditioner doesn’t have to be stressful. With the right guidance, it’s actually pretty straightforward.
In this guide, I’m going to walk you through everything you need to know about Daizuki air conditioner instructions—from unboxing to your first cool breeze. No jargon, no fluff, just clear, step-by-step advice based on real experience. Whether you’re installing a window unit, a portable model, or a split system, I’ve got you covered. We’ll talk about what’s in the box, how to choose the right spot, how to install it safely, and how to keep it running smoothly for years. By the end of this post, you’ll feel confident, informed, and ready to enjoy a cooler, more comfortable home. Let’s get started!
What’s in the Box? Unboxing Your Daizuki Air Conditioner
Before you even think about installation, take a moment to unpack your Daizuki air conditioner carefully. I can’t tell you how many times I’ve seen people rush this step and end up missing a crucial part—or worse, damaging the unit. So, slow down, grab a pair of scissors (not a knife—safety first!), and let’s go through what you should expect to find.
Visual guide about daizuki air conditioner instructions
Image source: cdn.shopify.com
Standard Components Included
Most Daizuki air conditioners come with a fairly consistent set of components, though the exact items may vary slightly depending on the model. Here’s a general checklist of what you’ll typically find inside the box:
- Main air conditioning unit – This is the heart of the system. It contains the compressor, condenser, evaporator, and fan.
- Exhaust hose(s) – Used to vent hot air outside, especially in portable models.
- Window mounting kit – Includes brackets, seals, and adjustable panels to secure the unit in a window or wall opening.
- Remote control and batteries – For convenient operation from across the room.
- User manual and warranty card – Essential for setup, troubleshooting, and registration.
- Drainage hose (if applicable) – Needed for models that produce condensation during dehumidification.
- Filter(s) – Usually a washable mesh or electrostatic filter to trap dust and allergens.
Take a photo of the contents as you unpack—this can help if you need to contact customer support later. Also, keep all packaging materials for at least a few weeks in case you need to return or exchange the unit.
Model-Specific Variations
Not all Daizuki air conditioners are created equal. For example, a portable AC will include an exhaust hose and window kit, while a window-mounted unit might come with side panels and a support bracket. Split systems are more complex and may include indoor and outdoor units, refrigerant lines, and electrical wiring components.
Here’s a quick example: I recently helped my sister set up a Daizuki portable AC (model DZ-PAC12). It came with a single exhaust hose, a window slider kit, and a remote. But when my neighbor installed a Daizuki window unit (DZ-W10), he received side extension panels and a reinforced mounting bracket. Always check your specific model’s manual—Daizuki usually includes a quick-reference guide inside the box that lists included parts.
Pro Tip: Inspect for Damage
Before you proceed, inspect every component for signs of damage—dents, cracks, or loose parts. If something looks off, don’t install it. Contact Daizuki customer service immediately. It’s better to resolve issues early than to struggle with a malfunctioning unit later.
Choosing the Right Location for Your Daizuki AC
Where you place your Daizuki air conditioner can make or break its performance. I learned this the hard way when I installed my first unit in a sunny corner of the living room—only to realize it was working twice as hard to cool the space. Location matters—not just for cooling efficiency, but also for safety, noise levels, and longevity of the unit.
Key Factors to Consider
When deciding where to install your Daizuki AC, keep these factors in mind:
- Sun exposure: Avoid direct sunlight if possible. Units in shaded areas run more efficiently and last longer.
- Ventilation: Ensure there’s at least 12–18 inches of clearance around the unit for proper airflow.
- Proximity to windows or doors: Essential for portable and window units that need to vent hot air outside.
- Noise sensitivity: Place the unit away from bedrooms or quiet areas if noise is a concern.
- Electrical access: Make sure there’s a nearby outlet that can handle the unit’s power requirements.
Best Practices for Window and Portable Units
For window and portable Daizuki models, the ideal location is a window that faces north or east (to minimize afternoon sun) and is centrally located in the room. Avoid installing near heat sources like ovens, radiators, or electronics that generate heat.
Here’s a real-life example: My friend installed her Daizuki portable AC in her home office, which had a large west-facing window. By 3 p.m., the room was like an oven. She moved the unit to an east-facing window, and suddenly, the cooling improved dramatically. The lesson? Even small changes in placement can have a big impact.
Avoid These Common Mistakes
- Blocking airflow: Don’t place furniture, curtains, or plants too close to the unit.
- Using extension cords: Daizuki units draw significant power. Always plug directly into a wall outlet.
- Ignoring floor stability: For portable units, make sure the floor is level and can support the weight (some models weigh over 70 lbs).
Take your time with this step. A well-placed AC doesn’t just cool better—it saves energy and reduces wear and tear.
Step-by-Step Installation Guide
Now for the main event: installing your Daizuki air conditioner. Don’t worry—I’ll break it down into simple, manageable steps. Whether you’re setting up a window unit, a portable model, or a split system, the principles are similar. Let’s focus on the most common types: window and portable ACs.
Installing a Daizuki Window Air Conditioner
Window units are popular because they’re efficient and don’t take up floor space. Here’s how to install one safely and correctly:
- Measure the window opening: Ensure your window can accommodate the unit. Most Daizuki window models fit standard double-hung or sliding windows.
- Prepare the window: Clean the sill and remove any obstructions. Open the window and remove the screen.
- Install the mounting bracket (if included): Secure it to the window sill using the provided screws. This helps support the weight of the unit.
- Attach the side panels: Slide the extension panels into the sides of the AC unit. These fill the gaps between the unit and the window frame.
- Place the unit in the window: With help (these units are heavy!), lift the AC into the opening. Make sure it’s level and seated securely on the bracket.
- Secure the window: Close the window sash onto the top of the unit. Use the provided screws or locking mechanism to prevent movement.
- Seal the gaps: Use weather stripping or foam tape to seal any gaps around the sides and top. This prevents warm air from leaking in.
- Plug it in: Connect the power cord to a dedicated outlet. Never use an extension cord.
Pro tip: Have a friend help you lift the unit. Window ACs can weigh 60–80 pounds, and dropping one can damage the unit—or worse, injure someone.
Setting Up a Daizuki Portable Air Conditioner
Portable units are great for renters or rooms without windows. Here’s how to set one up:
- Choose a location near a window: You’ll need to vent the hot air outside.
- Install the window kit: Most Daizuki portable models come with a adjustable window slider. Cut it to fit your window height, then secure it in place.
- Attach the exhaust hose: Connect one end to the back of the AC unit and the other to the window kit. Make sure the hose is straight and not kinked.
- Secure the hose: Use the provided clamps or brackets to prevent the hose from slipping out.
- Plug in the unit: Again, use a direct wall outlet.
- Turn it on and test: Set the temperature and fan speed. Listen for unusual noises or vibrations.
One thing I’ve noticed: some people forget to close the window completely after installing the slider. This can let hot air back in. Make sure the window is snug against the kit.
Split System Installation (Professional Recommended)
Daizuki split systems are more complex and typically require professional installation. They involve mounting an indoor unit on the wall, installing an outdoor condenser, and connecting refrigerant lines. If you’re not experienced with electrical or HVAC work, hire a certified technician. Attempting a DIY split system install can void your warranty and pose safety risks.
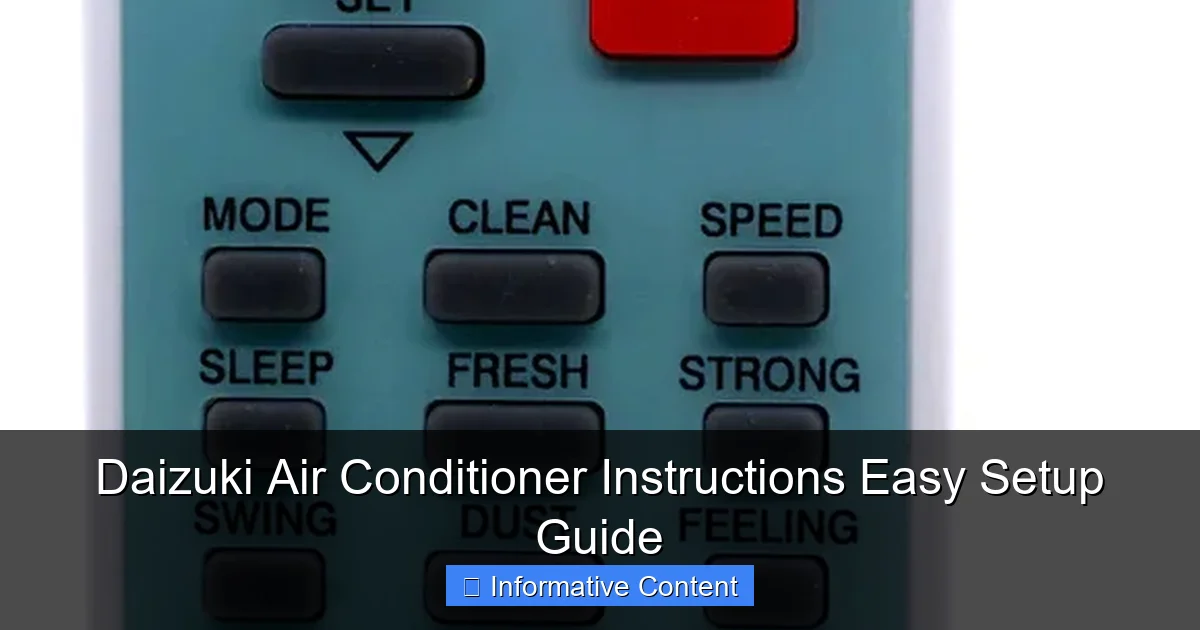
Understanding Daizuki Air Conditioner Controls and Settings
Once your Daizuki air conditioner is installed, it’s time to learn how to use it. The control panel and remote might look intimidating at first, but once you understand the basics, it’s surprisingly intuitive. Let’s break down the key features and settings.
Main Control Panel Features
Most Daizuki models have a digital display and buttons for power, mode, temperature, fan speed, and timer. Here’s what each typically does:
- Power: Turns the unit on or off.
- Mode: Cycles through cooling, fan, dehumidify, and sometimes heat (on heat pump models).
- Temperature: Adjusts the desired room temperature (usually between 60°F and 86°F).
- Fan Speed: Controls how fast the fan runs (low, medium, high, or auto).
- Timer: Lets you schedule when the unit turns on or off.
- Sleep Mode: Gradually adjusts temperature overnight for comfort and energy savings.
Using the Remote Control
The remote is your best friend. It usually includes all the same functions as the control panel, plus extras like:
- Turbo Mode: Runs the AC at maximum cooling for quick temperature drops.
- Eco Mode: Reduces power consumption by adjusting fan and compressor speed.
- Swing: Adjusts the direction of airflow (up/down or left/right).
I love using the timer function. I set my Daizuki to turn on 30 minutes before I get home from work—so I walk into a cool, comfortable house. It’s a small luxury that makes a big difference.
Smart Features (on Select Models)
Some newer Daizuki models come with Wi-Fi connectivity and app control. You can adjust settings from your phone, set schedules, and even receive maintenance reminders. If your model supports it, download the Daizuki app (usually available on iOS and Android) and follow the pairing instructions in the manual.
Maintenance Tips to Keep Your Daizuki AC Running Smoothly
A well-maintained air conditioner lasts longer, runs more efficiently, and keeps your air cleaner. I used to ignore maintenance until my unit started making weird noises and cooling poorly. Now, I follow a simple routine—and it’s made all the difference.
Monthly Maintenance Checklist
- Clean or replace the air filter: A dirty filter restricts airflow and makes the unit work harder. Most Daizuki filters are washable—rinse with water and let dry completely before reinstalling.
- Check the exhaust hose (portable units): Make sure it’s not kinked or blocked.
- Inspect the window seal: Look for gaps or wear that could let warm air in.
- Wipe down the exterior: Use a damp cloth to remove dust and dirt.
Seasonal Deep Cleaning
At the start and end of each cooling season, do a more thorough cleaning:
- Clean the condenser coils (if accessible): Use a soft brush or coil cleaner to remove dirt buildup.
- Check drainage: Ensure the drain hole (if your model has one) is clear of debris.
- Inspect electrical connections: Look for loose wires or corrosion (only if you’re comfortable doing so).
When to Call a Professional
Some tasks are best left to experts:
- Recharging refrigerant
- Repairing electrical components
- Servicing the compressor
If your unit isn’t cooling, making strange noises, or leaking water, it’s time to call a technician. Don’t try to fix internal components yourself—this can be dangerous and void your warranty.
Energy Efficiency and Cost-Saving Tips
Nobody likes a high electricity bill. The good news? Your Daizuki air conditioner can be both powerful and efficient—if you use it wisely. Here’s how to get the most cooling for your money.
Optimize Your Settings
- Set the thermostat to 78°F: This is the sweet spot for comfort and efficiency. Every degree lower can increase energy use by 6–8%.
- Use fan mode when possible: Circulating air feels cooler and uses less energy than full cooling.
- Enable Eco or Sleep Mode: These features reduce power consumption without sacrificing comfort.
Improve Home Insulation
Your AC works harder if your home is leaking cool air. Seal windows, close curtains during the day, and use ceiling fans to circulate air. I added blackout curtains to my living room and noticed a big difference in how long the AC stayed off.
Regular Maintenance = Lower Bills
A clean filter and well-maintained unit use less energy. According to the U.S. Department of Energy, regular maintenance can improve efficiency by up to 15%. That’s real savings over time.
Common Issues and Troubleshooting
Even the best air conditioners can run into problems. Here are some common issues with Daizuki units and how to fix them.
Unit Won’t Turn On
- Check the power cord and outlet.
- Make sure the remote has batteries.
- Reset the circuit breaker.
Not Cooling Properly
- Clean the air filter.
- Ensure the exhaust hose is properly vented.
- Check for blocked airflow around the unit.
Water Leaking
- Clear the drain hole.
- Make sure the unit is level.
- Check for excessive humidity or a clogged filter.
Unusual Noises
- Rattling: Loose parts or debris in the fan.
- Banging: Compressor issue—call a technician.
- Hissing: Possible refrigerant leak—stop use and contact support.
Always refer to your Daizuki air conditioner instructions for model-specific troubleshooting. The manual often includes a diagnostic chart that can save you time.
Final Thoughts: Enjoying Your Daizuki Air Conditioner
Setting up and using a Daizuki air conditioner doesn’t have to be complicated. With the right preparation, a little patience, and this guide, you’ll be enjoying cool, comfortable air in no time. Remember: take your time with installation, choose the right location, and keep up with maintenance. These small steps add up to big savings and better performance.
I’ve used several air conditioners over the years, and Daizuki stands out for its reliability, quiet operation, and user-friendly design. Whether you’re cooling a small bedroom or a large living space, these units deliver consistent results. And now that you know how to set them up and care for them, you’re all set to beat the heat—season after season.
So go ahead, plug it in, adjust the settings, and take a deep breath of cool, refreshing air. You’ve earned it.
Frequently Asked Questions
How do I set up my Daizuki air conditioner for the first time?
To set up your Daizuki air conditioner, start by unpacking the unit and placing it in a well-ventilated area. Follow the Daizuki air conditioner instructions to secure the mounting bracket, connect the drainage hose, and plug it into a grounded outlet.
Where can I find the official Daizuki air conditioner instructions?
The official Daizuki air conditioner instructions are included in the user manual that comes with your unit. You can also download a digital copy from the Daizuki official website under the support or downloads section.
How do I program the timer on my Daizuki air conditioner?
To program the timer, press the “Timer” button on the remote control and set your desired on or off time using the up and down arrows. Confirm your selection by pressing the “Enter” or “Set” button as outlined in the Daizuki air conditioner instructions.
Why is my Daizuki air conditioner not cooling properly?
Check if the air filter is clean and the temperature is set correctly. Also, ensure the outdoor unit isn’t blocked and that the refrigerant levels are adequate—refer to the Daizuki air conditioner instructions for troubleshooting steps.
Can I use a Daizuki air conditioner with a smart home system?
Some Daizuki models are compatible with Wi-Fi and smart home platforms like Alexa or Google Home. Check your model’s specifications in the Daizuki air conditioner instructions to confirm smart functionality and setup steps.
How often should I clean the filters on my Daizuki air conditioner?
It’s recommended to clean the filters every two weeks during heavy use to maintain efficiency and air quality. Detailed cleaning steps are provided in the Daizuki air conditioner instructions included with your unit.

