
Understanding your Carrier air conditioner parts diagram is essential for troubleshooting, repairs, and routine maintenance. This guide breaks down every major component, explains how they work together, and helps you identify parts quickly—even if you’re not a technician.
If your Carrier air conditioner suddenly stops cooling or starts making strange noises, your first instinct might be to call a technician. But what if you could diagnose the problem yourself—just by understanding what’s inside your unit? That’s where a Carrier air conditioner parts diagram comes in. Think of it as a map of your AC system, showing every major component and how they connect. Whether you’re a homeowner, a DIY enthusiast, or a property manager, knowing how to read this diagram can save you time, money, and frustration.
Modern air conditioners, especially trusted brands like Carrier, are built with precision and efficiency in mind. But like any complex machine, they rely on multiple parts working in harmony. When one component fails, it can affect the entire system. A parts diagram doesn’t just show you what’s there—it helps you understand how each piece contributes to the cooling process. From the compressor that pumps refrigerant to the fan that circulates air, every part has a role. And when you can pinpoint which part is causing trouble, you’re already halfway to fixing it.
In this guide, we’ll walk you through a detailed breakdown of a typical Carrier air conditioner parts diagram. You’ll learn what each component does, where it’s located, and how to identify common issues. We’ll also share practical tips for maintenance and troubleshooting, so you can keep your AC running smoothly all summer long. No technical degree required—just a willingness to learn and a little curiosity.
Key Takeaways
- Know Your Unit: A Carrier air conditioner parts diagram helps you identify key components like the compressor, condenser coil, and evaporator coil for easier troubleshooting.
- Improve Maintenance: Regular inspections using the diagram can prevent breakdowns and extend your AC’s lifespan.
- Save on Repairs: Identifying faulty parts early reduces costly emergency service calls and downtime.
- DIY-Friendly: Many minor fixes—like replacing a capacitor or cleaning coils—can be done safely with guidance from the diagram.
- Ensure Compatibility: When ordering replacement parts, the diagram ensures you get the correct model-specific components.
- Enhance Efficiency: Understanding airflow and refrigerant paths helps optimize performance and energy use.
- Safety First: Always turn off power before inspecting or handling internal parts, even when using a diagram.
📑 Table of Contents
- Why a Parts Diagram Matters for Your Carrier AC
- Understanding the Outdoor Unit: The Heart of Your AC System
- Exploring the Indoor Unit: Where Cool Air Begins
- Refrigerant System: The Circulatory System of Your AC
- Electrical Components: Powering the System
- Maintenance Tips Using Your Parts Diagram
- Conclusion
Why a Parts Diagram Matters for Your Carrier AC
Let’s be honest: most people don’t think about their air conditioner until it stops working. And when it does, panic sets in. You’re sweating, your energy bill is about to spike, and you’re staring at a metal box on your roof or outside your house with no idea what’s wrong. That’s where a Carrier air conditioner parts diagram becomes your best friend.
A parts diagram is more than just a technical drawing—it’s a visual guide that shows you the layout of your AC unit. It labels every major component, from the outdoor condenser to the indoor evaporator coil, and often includes part numbers, wiring details, and assembly instructions. For Carrier units, these diagrams are especially helpful because the brand uses consistent designs across many models, making it easier to find and replace parts.
But why does this matter? First, it empowers you to communicate better with technicians. Instead of saying, “It’s making a loud noise,” you can say, “The compressor sounds like it’s struggling to start.” That kind of detail can speed up diagnosis and reduce labor costs. Second, it helps you perform routine maintenance. For example, knowing where the air filter is located—and how to access it—means you can change it regularly, improving airflow and efficiency.
Third, a parts diagram can prevent costly mistakes. If you’re ordering a replacement part online, using the diagram ensures you get the right one. There’s nothing worse than waiting a week for a new capacitor only to find it doesn’t fit. And finally, understanding your system builds confidence. You’ll feel more in control of your home’s comfort, knowing you can handle minor issues without calling for help every time.
Understanding the Outdoor Unit: The Heart of Your AC System
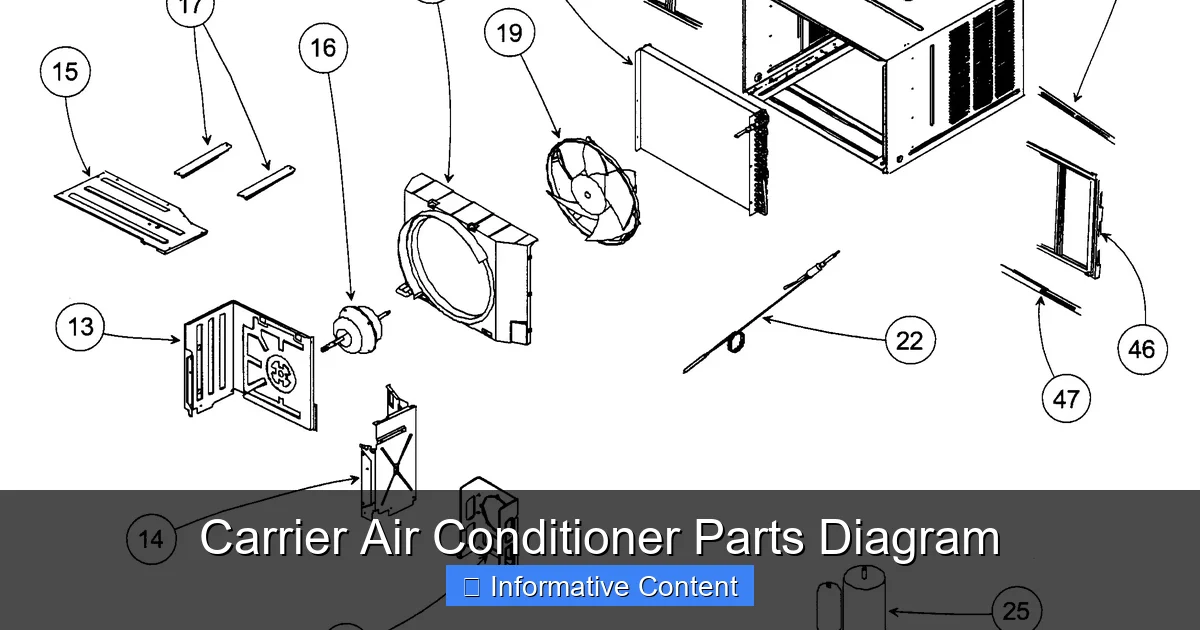
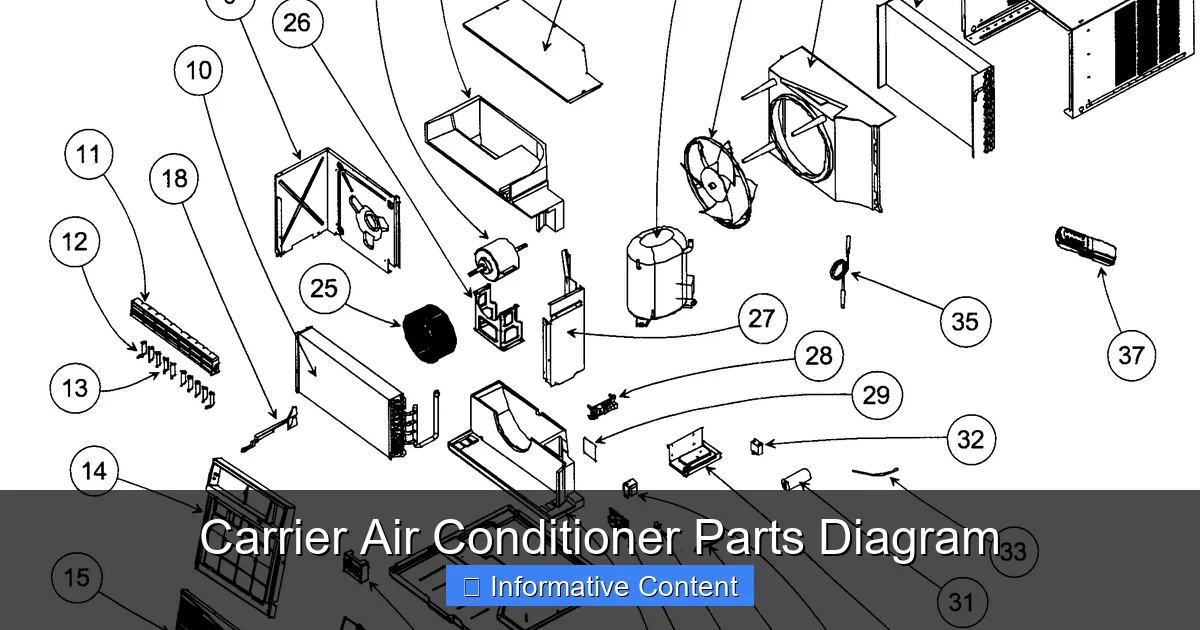
Visual guide about Carrier Air Conditioner Parts Diagram
Image source: detoxicrecenze.com
The outdoor unit of your Carrier air conditioner is where the magic begins. This is the part you see sitting on a concrete pad or mounted on your roof, and it’s responsible for releasing heat from your home into the outside air. Inside this unit, several key components work together to keep your indoor air cool and comfortable.
The Compressor: The Engine of Cooling
At the center of the outdoor unit is the compressor. Think of it as the heart of your AC system—it pumps refrigerant through the entire cooling cycle. When the refrigerant enters the compressor as a low-pressure gas, the compressor squeezes it, increasing its pressure and temperature. This high-pressure, high-temperature gas then moves to the condenser coil.
Carrier uses reliable compressors like scroll and reciprocating types, depending on the model. Scroll compressors are quieter and more efficient, making them common in newer units. If your AC isn’t cooling but the fan is running, the compressor might be the culprit. Listen for a humming sound without the usual startup—this could mean the compressor is trying to start but failing, often due to a faulty capacitor or electrical issue.
The Condenser Coil: Releasing Heat
Right next to the compressor is the condenser coil, a series of thin, finned tubes that look like a radiator. As the hot refrigerant gas flows through these coils, the outdoor fan blows air across them, cooling the refrigerant and turning it into a high-pressure liquid. This process releases the heat absorbed from your home’s interior.
Over time, the condenser coil can get dirty from dust, grass clippings, or debris. A dirty coil restricts airflow and reduces efficiency, forcing the compressor to work harder. You can clean it gently with a garden hose (never a pressure washer) and a soft brush. Just make sure the power is off before you start.
The Condenser Fan and Motor
The large fan mounted on top of the outdoor unit is the condenser fan. It’s powered by a motor that spins the blades to draw air through the condenser coil. If the fan isn’t spinning, the coil can’t release heat, and your AC will overheat or shut down.
Common issues include a seized motor, a broken fan blade, or a faulty capacitor. If the fan makes a grinding noise or doesn’t spin at all, check the capacitor first—it’s a small, cylindrical part that stores energy to help the motor start. Replacing a capacitor is one of the easiest DIY fixes and costs under $20.
The Reversing Valve (on Heat Pumps)
If you have a Carrier heat pump, your outdoor unit includes a reversing valve. This component changes the direction of refrigerant flow, allowing the system to heat your home in winter and cool it in summer. It’s controlled by a solenoid and located near the compressor.
A stuck reversing valve can cause the system to blow warm air in cooling mode or cold air in heating mode. If you suspect this issue, a technician may need to replace the valve or the solenoid. But knowing where it is—and what it does—helps you explain the problem clearly.
Exploring the Indoor Unit: Where Cool Air Begins
While the outdoor unit handles the heavy lifting, the indoor unit is where cool air is delivered to your living spaces. This part is usually housed in your attic, basement, or utility closet and connects to your ductwork. Understanding its components is key to maintaining airflow and indoor air quality.
The Evaporator Coil: Absorbing Heat
The evaporator coil is the indoor counterpart to the condenser coil. It’s a series of cold, finned tubes located inside the air handler or furnace. As warm air from your home is blown over the coil by the indoor fan, the refrigerant inside absorbs heat, cooling the air before it’s circulated back through the ducts.
A dirty or frozen evaporator coil is a common problem. If you notice reduced airflow or ice buildup on the coil, it could be due to a clogged air filter, low refrigerant, or a malfunctioning blower motor. Always check the air filter first—it’s the simplest fix and prevents many coil issues.
The Blower Motor and Fan
The blower motor powers the indoor fan that circulates air through your home. It’s usually located in the air handler and can be either single-speed or variable-speed. Variable-speed motors are more efficient and provide better humidity control.
If your AC is running but not cooling, the blower motor might not be spinning. Check the capacitor and ensure the motor isn’t overheating. Some motors have thermal protection that shuts them off if they get too hot. Letting the system rest for 30 minutes may allow it to reset.
The Air Filter: The First Line of Defense
The air filter is one of the most important—and often overlooked—parts of your AC system. It traps dust, pollen, and other particles before they enter the evaporator coil or your lungs. A clean filter improves airflow, reduces strain on the blower motor, and enhances indoor air quality.
Most Carrier units use standard 1-inch or 2-inch filters that should be replaced every 1–3 months. Check your parts diagram to locate the filter slot—it’s usually behind a removable panel near the return air duct. If you have pets or allergies, consider upgrading to a high-efficiency filter.
The Thermostat: The Control Center
While not physically part of the indoor unit, the thermostat controls when the AC turns on and off based on your desired temperature. Modern Carrier systems often use smart thermostats that can be programmed or controlled via smartphone.
If your AC isn’t responding, check the thermostat settings first. Make sure it’s set to “cool” and the temperature is lower than the current room temperature. Also, ensure the thermostat is clean and free of dust, which can affect its sensors.
Refrigerant System: The Circulatory System of Your AC
Refrigerant is the lifeblood of your air conditioner. It absorbs heat from your home and releases it outside, enabling the cooling cycle. Understanding how refrigerant flows through your system—and what can go wrong—is essential for diagnosing performance issues.
Refrigerant Lines: The Highways of Cooling
Two copper lines connect the indoor and outdoor units: the suction line and the liquid line. The suction line carries low-pressure refrigerant gas from the evaporator coil to the compressor. The liquid line carries high-pressure liquid refrigerant from the condenser to the expansion valve.
These lines are insulated to prevent energy loss and condensation. If you see frost or ice on the suction line, it could indicate low refrigerant or a blocked airflow. Never ignore ice buildup—it can damage the compressor over time.
The Expansion Valve: Controlling Flow
The expansion valve (or metering device) regulates how much refrigerant enters the evaporator coil. It reduces the pressure of the liquid refrigerant, allowing it to expand and cool rapidly before absorbing heat from the air.
A faulty expansion valve can cause insufficient cooling or flooding of the evaporator coil. Symptoms include warm air blowing from vents or ice forming on the indoor unit. Replacing the valve requires a licensed technician, as it involves handling refrigerant.
Refrigerant Charge: Getting the Balance Right
Your AC system is designed to operate with a specific amount of refrigerant. Too little (undercharge) reduces cooling capacity and can damage the compressor. Too much (overcharge) increases pressure and reduces efficiency.
Only certified HVAC professionals should add or remove refrigerant. If you suspect a leak, look for oily residue around connections or hissing sounds. Common leak points include Schrader valves, flare fittings, and the evaporator coil.
Electrical Components: Powering the System
Your Carrier air conditioner relies on several electrical parts to function. These components control power distribution, motor operation, and system safety. Understanding them can help you troubleshoot electrical issues and avoid hazards.
The Contactor: The On/Off Switch
The contactor is a relay that connects the high-voltage power from your electrical panel to the compressor and condenser fan. When the thermostat calls for cooling, it sends a low-voltage signal to the contactor, which closes the circuit and powers the outdoor unit.
A worn or pitted contactor can cause intermittent operation or prevent the unit from starting. If you hear a clicking sound but the compressor doesn’t start, the contactor may need replacement. Always turn off the power at the breaker before inspecting.
Capacitors: Storing Energy for Motors
Capacitors store electrical energy and release it to help motors start and run. There are usually two in your AC unit: a start capacitor and a run capacitor. The start capacitor gives the compressor and fan motors an extra boost when they first turn on.
A failed capacitor is one of the most common AC problems. Signs include a humming compressor that won’t start or a fan that spins slowly. Capacitors are inexpensive and easy to replace, but they can hold a charge even when the power is off—so always discharge them safely with an insulated screwdriver.
The Control Board: The Brain of the System
The control board manages all electrical functions, including thermostat signals, fan speeds, and safety controls. It’s usually located in the indoor unit or outdoor control panel.
If your AC behaves erratically—turning on and off randomly, not responding to the thermostat, or displaying error codes—the control board may be faulty. Some Carrier models have diagnostic lights that flash error codes, which can be cross-referenced in the manual.
Maintenance Tips Using Your Parts Diagram
Now that you understand the key components, let’s talk about how to use your Carrier air conditioner parts diagram for maintenance. Regular upkeep not only prevents breakdowns but also improves efficiency and extends the life of your system.
Monthly Checks
– Inspect and replace the air filter.
– Check the outdoor unit for debris and clear any leaves or grass.
– Listen for unusual noises when the system starts.
Seasonal Maintenance
– Clean the condenser and evaporator coils.
– Inspect refrigerant lines for damage or leaks.
– Test the capacitor and contactor for wear.
Annual Professional Service
Even with DIY care, schedule a professional tune-up once a year. A technician will check refrigerant levels, test electrical connections, lubricate moving parts, and ensure everything is working safely and efficiently.
Conclusion
A Carrier air conditioner parts diagram is more than a technical reference—it’s a tool for empowerment. By understanding the components inside your unit, you can troubleshoot issues, perform basic maintenance, and communicate effectively with technicians. Whether you’re replacing a capacitor, cleaning a coil, or simply curious about how your AC works, the diagram gives you the knowledge to take control.
Remember, regular maintenance is the best way to avoid costly repairs and keep your home cool and comfortable. Use the diagram to stay informed, stay proactive, and get the most out of your Carrier air conditioner for years to come.
Frequently Asked Questions
Where can I find a Carrier air conditioner parts diagram?
You can find a parts diagram in your unit’s owner’s manual, on Carrier’s official website, or by contacting their customer support. Many diagrams are also available through HVAC supply websites using your model number.
Can I use a parts diagram to replace parts myself?
Yes, for simple components like capacitors, air filters, or contactors. However, refrigerant-related repairs should only be done by licensed professionals due to safety and environmental regulations.
What does a frozen evaporator coil indicate?
A frozen coil often means restricted airflow (from a dirty filter) or low refrigerant. Turn off the system, let it thaw, and check the air filter first before calling a technician.
How often should I clean the condenser coil?
Clean the outdoor condenser coil at least once a year, preferably before summer. More frequent cleaning may be needed if you live in a dusty area or have pets.
Why is my AC running but not cooling?
This could be due to a dirty filter, low refrigerant, a faulty compressor, or a malfunctioning blower motor. Use the parts diagram to check each component systematically.
Is it safe to handle electrical parts without experience?
No. Always turn off power at the breaker before inspecting any electrical components. If you’re unsure, consult a professional to avoid injury or damage.