
Carrier air conditioner fault codes help diagnose system issues quickly. Understanding these error messages can save time, money, and prevent further damage. This guide breaks down the most common codes and offers practical solutions.
Key Takeaways
- Fault codes are diagnostic tools: Carrier AC units display error codes to pinpoint problems, helping technicians and homeowners identify issues fast.
- Common codes include E1, E2, and E3: These often relate to temperature sensors, airflow, or refrigerant levels and should be addressed promptly.
- Resetting the system may resolve minor glitches: Power cycling your unit can clear temporary errors and restore normal operation.
- Regular maintenance prevents many faults: Cleaning filters, checking coils, and inspecting wiring reduce the chance of error codes appearing.
- Some codes require professional help: Electrical or refrigerant-related errors should be handled by certified HVAC technicians for safety.
- User manuals are essential resources: Always refer to your specific model’s manual for accurate code definitions and troubleshooting steps.
- Smart thermostats enhance monitoring: Modern Carrier systems with Wi-Fi connectivity can send alerts and detailed diagnostics to your phone.
📑 Table of Contents
Understanding Carrier Air Conditioner Fault Codes
When your Carrier air conditioner suddenly stops working or starts behaving oddly, it’s easy to panic. But before you call a technician or start worrying about costly repairs, take a deep breath. Most modern Carrier AC units are equipped with built-in diagnostic systems that display fault codes—short error messages that tell you exactly what’s wrong.
These codes appear on the thermostat display, indoor unit, or outdoor condenser, depending on your model. They’re designed to help both homeowners and HVAC professionals quickly identify the source of a problem. Instead of guessing whether it’s a refrigerant leak, a dirty filter, or a faulty sensor, the system gives you a clear clue.
Think of fault codes like your AC’s way of saying, “Hey, something’s not right here—check this part!” They’re not meant to scare you. In fact, they’re incredibly helpful. With a little knowledge, you can often resolve minor issues yourself or at least understand what the technician is talking about when they arrive.
In this guide, we’ll walk you through the most common Carrier air conditioner fault codes, what they mean, and how to respond. Whether you’re dealing with an E1 error or a blinking light pattern, you’ll know what steps to take next.
How Carrier Fault Codes Work
Visual guide about Carrier Air Conditioner Fault Codes
Image source: acerrorcode.com
Carrier air conditioners use a combination of sensors, microprocessors, and control boards to monitor system performance. When something goes outside normal operating parameters—like a temperature spike, low airflow, or electrical irregularity—the system triggers a fault code.
These codes are usually displayed as alphanumeric combinations (like “E1” or “F3”) or as blinking LED lights on the indoor or outdoor unit. Some newer models with smart thermostats will show the code directly on the screen, along with a brief description.
The fault code system is part of Carrier’s commitment to reliability and ease of service. It’s not just about detecting problems—it’s about helping you fix them faster. For example, if your AC detects a blocked airflow, it might show a code related to the blower motor or air filter. That way, you can check the filter before assuming the compressor is broken.
It’s important to note that not all fault codes mean a major repair is needed. Some are temporary glitches caused by power surges, dirty components, or minor sensor misreads. In many cases, simply resetting the system or cleaning a part can clear the error.
However, some codes indicate serious issues—like refrigerant leaks, electrical faults, or compressor failure—that require professional attention. Ignoring these can lead to bigger problems, higher energy bills, or even complete system breakdowns.
Where to Find Fault Codes
Fault codes can appear in several places, depending on your Carrier model:
– Thermostat display: Most modern Carrier systems with digital thermostats show codes directly on the screen. Look for messages like “System Fault” or a specific error number.
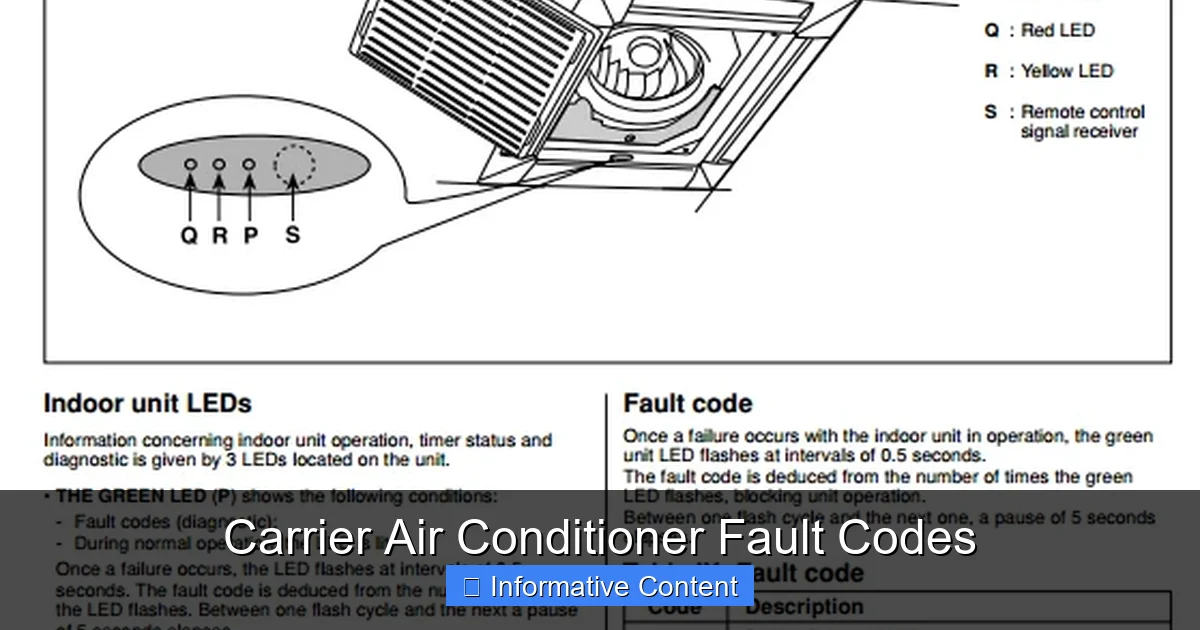
– Indoor unit LED lights: Some models use blinking lights on the air handler or furnace to signal errors. The pattern (e.g., two blinks, pause, three blinks) corresponds to a specific code.
– Outdoor unit display: High-end Carrier condensers may have a small LCD screen that shows diagnostic information.
– Mobile app alerts: If your system is connected to Carrier’s Côr or Infinity app, you may receive push notifications when a fault occurs.
Always check your user manual to understand how your specific model displays fault codes. The manual will also provide a full list of possible codes and their meanings.
How to Read Blinking Light Patterns
If your Carrier AC uses LED lights instead of a digital display, don’t worry—you can still decode the message. Here’s how:
1. Locate the LED light on the indoor unit (usually near the control board).
2. Count the number of blinks between pauses.
3. Match the pattern to the code list in your manual.
For example, two short blinks followed by a long pause might mean “E2 – Low Pressure Switch Open.” Three blinks could indicate “E3 – High Pressure Switch Open.”
Some systems use a combination of short and long blinks. A long blink might count as five, so a pattern of long-short-short could mean “7” (5 + 1 + 1).
Keep a notepad handy when diagnosing. Write down the blink sequence and compare it to your manual. If you’re unsure, take a video and show it to a technician.
Common Carrier Air Conditioner Fault Codes and What They Mean
Now that you know how fault codes work, let’s look at some of the most common ones you might encounter. We’ll break them down by category and explain what each means, along with practical steps you can take.
E1 – Indoor Temperature Sensor Fault
The E1 code typically means the indoor temperature sensor is malfunctioning or giving incorrect readings. This sensor tells the system how warm or cool your home is, so if it’s wrong, your AC might not turn on, run constantly, or fail to cool properly.
What to do:
– Turn off the power to the unit at the breaker.
– Locate the indoor sensor (usually near the evaporator coil).
– Check for loose wires or corrosion.
– Gently clean the sensor with a soft cloth.
– Restore power and see if the code clears.
If the problem persists, the sensor may need replacement. This is a relatively inexpensive part, but it’s best handled by a technician if you’re not comfortable with electrical work.
E2 – Low Pressure Switch Open
The E2 code indicates that the low-pressure switch has tripped, often due to low refrigerant levels or restricted airflow. This switch protects the compressor from damage by shutting down the system when pressure drops too low.
What to do:
– Check the air filter. A clogged filter can restrict airflow and cause low pressure.
– Inspect the evaporator coil for dirt or frost buildup.
– Ensure all vents and returns are open and unobstructed.
– If the filter and coil are clean, the issue may be a refrigerant leak.
Important: Never attempt to add refrigerant yourself. Only licensed technicians should handle refrigerant due to environmental and safety regulations.
E3 – High Pressure Switch Open
The E3 code means the high-pressure switch has activated, usually because the system is over-pressurized. This can happen if the condenser coil is dirty, the fan isn’t working, or there’s a blockage in the refrigerant line.
What to do:
– Turn off the unit and let it cool down.
– Check the outdoor condenser unit for dirt, leaves, or debris.
– Clean the coil gently with a garden hose (never use a pressure washer).
– Make sure the fan is spinning freely and not obstructed.
– If the fan isn’t running, it may need repair or replacement.
High pressure can damage the compressor, so don’t ignore this code. If cleaning doesn’t help, call a professional.
E4 – Outdoor Temperature Sensor Fault
The E4 code points to a problem with the outdoor temperature sensor. This sensor helps the system adjust its operation based on outside conditions. If it fails, your AC might not switch to heat mode in winter or could run inefficiently in summer.
What to do:
– Locate the outdoor sensor (usually near the condenser coil).
– Check for physical damage or loose connections.
– Clean any dirt or debris around the sensor.
– Reset the system by turning off the power for 5 minutes.
If the code returns, the sensor may need replacement. This is a quick fix for most technicians.
E5 – Communication Error Between Indoor and Outdoor Units
The E5 code means the indoor and outdoor units aren’t communicating properly. This can happen due to wiring issues, a faulty control board, or power fluctuations.
What to do:
– Turn off the power to both units.
– Inspect the wiring between the indoor and outdoor units for damage or loose connections.
– Look for burnt or frayed wires.
– Restore power and see if communication resumes.
If the problem continues, the issue may be with the control board or a deeper electrical fault. This requires professional diagnosis.
F1 – Blower Motor Fault
The F1 code indicates a problem with the blower motor, which circulates air through your home. This could mean the motor is overheating, the capacitor is failing, or the motor itself is worn out.
What to do:
– Check the air filter—restricted airflow can cause the motor to overheat.
– Listen for unusual noises (grinding, squealing) from the indoor unit.
– Ensure the blower wheel is clean and spins freely.
– If the motor is hot to the touch, let it cool before restarting.
Blower motor issues often require professional repair or replacement, especially if the capacitor or windings are damaged.
F2 – Flame Sensor Fault (Heat Pump Models)
If you have a Carrier heat pump with auxiliary heat, the F2 code may appear when the flame sensor is dirty or malfunctioning. The flame sensor detects whether the gas burner is lit and shuts off the gas if it’s not.
What to do:
– Turn off the power and gas supply.
– Locate the flame sensor (usually near the burner assembly).
– Clean it gently with fine steel wool or emery cloth.
– Reinstall and restore power.
A dirty flame sensor is a common issue and often resolves with cleaning. If it fails again, the sensor may need replacement.
How to Reset Your Carrier Air Conditioner
Sometimes, a simple reset can clear a fault code and restore normal operation—especially if the error was caused by a temporary glitch like a power surge or sensor misread.
Step-by-Step Reset Process
1. Turn off the thermostat: Switch your thermostat to “Off” to stop the system.
2. Shut off the power: Go to your electrical panel and turn off the breaker that controls the AC unit. Wait at least 30 seconds.
3. Turn the power back on: Flip the breaker back to “On.”
4. Wait 5–10 minutes: Allow the system to reboot and recalibrate.
5. Turn the thermostat back on: Set it to “Cool” and see if the fault code is gone.
If the code returns immediately, the issue is likely not temporary. Avoid repeatedly resetting the system, as this can cause further damage.
When Not to Reset
Don’t reset your system if:
– The unit is making loud noises or smoking.
– You smell gas or burning plastic.
– The outdoor unit is frozen or leaking water.
– The fault code indicates a refrigerant or electrical issue.
In these cases, turn off the power and call a technician right away.
Preventing Fault Codes Through Maintenance
The best way to avoid fault codes is to keep your Carrier air conditioner well-maintained. Regular care not only prevents errors but also extends the life of your system and improves energy efficiency.
Monthly Maintenance Tips
– Check and replace air filters: Dirty filters restrict airflow and can trigger E2 or F1 codes. Replace them every 1–3 months, depending on usage and pets.
– Clear debris around the outdoor unit: Keep leaves, grass, and dirt away from the condenser. Trim plants at least 2 feet around the unit.
– Inspect vents and returns: Make sure furniture, curtains, or rugs aren’t blocking airflow.
Seasonal Maintenance
– Spring (before cooling season): Schedule a professional tune-up. Technicians will check refrigerant levels, clean coils, test capacitors, and inspect wiring.
– Fall (before heating season): Clean the indoor coil, check the heat exchanger, and test the thermostat.
Annual Professional Service
Even with good DIY care, your AC needs annual professional maintenance. A certified HVAC technician can:
– Detect early signs of wear.
– Clean internal components you can’t reach.
– Test system performance and safety controls.
– Update firmware on smart systems.
Investing in annual service can prevent up to 95% of common AC problems—including many fault codes.
When to Call a Professional
While some fault codes can be resolved with simple fixes, others require expert attention. Here’s when you should call a technician:
– The fault code involves refrigerant (E2, E3).
– There’s an electrical issue (E5, F1).
– The system won’t turn on or keeps tripping breakers.
– You hear unusual noises or see smoke.
– The unit is leaking water or refrigerant.
– The same code keeps returning after reset.
Attempting to fix complex issues yourself can be dangerous and may void your warranty. Always prioritize safety and consult a licensed Carrier dealer or HVAC professional.
Conclusion
Carrier air conditioner fault codes are your system’s way of communicating problems—don’t ignore them. With the knowledge from this guide, you can interpret common codes, take appropriate action, and decide when to call for help.
Remember, many faults are preventable with regular maintenance. Clean filters, clear debris, and schedule annual service to keep your AC running smoothly. And when a code does appear, stay calm—most are fixable with a little troubleshooting or professional support.
By understanding your Carrier system’s diagnostic signals, you’re not just a homeowner—you’re an informed user who can save time, money, and stress. Keep this guide handy, refer to your manual, and enjoy reliable, efficient cooling all season long.
Frequently Asked Questions
What does the E1 code mean on a Carrier air conditioner?
The E1 code indicates a problem with the indoor temperature sensor. This sensor monitors the air temperature inside your home and helps the system decide when to cool. If it’s faulty, your AC may not turn on or could run constantly.
Can I fix a Carrier AC fault code myself?
Some fault codes, like those caused by dirty filters or loose sensors, can be fixed at home. However, codes related to refrigerant, electrical issues, or compressor problems should be handled by a licensed technician for safety and warranty reasons.
How do I reset my Carrier air conditioner after a fault code?
Turn off the thermostat, shut off the power at the breaker, wait 30 seconds, then restore power. Wait 5–10 minutes before turning the thermostat back on. This reset can clear temporary glitches.
Why does my Carrier AC keep showing the same fault code?
If a fault code returns after resetting, the underlying issue hasn’t been resolved. For example, a recurring E2 code may indicate a refrigerant leak that needs professional repair.
Do all Carrier models use the same fault codes?
Most Carrier models use similar fault code systems, but exact codes and meanings can vary by model and year. Always refer to your specific unit’s user manual for accurate information.
How often should I service my Carrier air conditioner?
You should have your Carrier AC professionally serviced once a year, ideally before the cooling season. Regular maintenance prevents many common faults and keeps your system running efficiently.