
Featured image for carrier air conditioner control panel instructions
Image source: i.ytimg.com
Master your Carrier air conditioner with simple, step-by-step control panel instructions designed for effortless use. From adjusting temperature settings to activating energy-saving modes, this guide breaks down every button and function for quick, confident operation—no manual required.
Key Takeaways
- Master the display: Understand icons and indicators for quick status checks.
- Set modes correctly: Choose Cool, Heat, or Auto for optimal comfort.
- Adjust fan speed: Use low, medium, or high for energy-efficient airflow.
- Program schedules: Save energy with timed on/off settings.
- Use sleep mode: Enable for quieter, efficient overnight cooling.
- Reset filters regularly: Maintain performance by clearing filter alerts.
- Lock controls: Prevent changes with child lock for safety.
📑 Table of Contents
- Understanding Your Carrier Air Conditioner Control Panel
- Getting Started: Identifying Your Control Panel Type
- Basic Controls: What Each Button and Icon Means
- Advanced Settings: Scheduling, Smart Features, and Energy Saving
- Troubleshooting Common Control Panel Issues
- Maintenance and Care: Keeping Your Control Panel in Top Shape
- Data Table: Common Carrier Control Panel Models and Features
- Conclusion: Your Carrier Control Panel, Simplified
Understanding Your Carrier Air Conditioner Control Panel
Let’s be honest—standing in front of your Carrier air conditioner’s control panel can feel like staring at a spaceship dashboard. Buttons, icons, and blinking lights everywhere. You just want to cool your home, not decipher a secret code. I’ve been there. One summer, my family gathered in the living room, sweating, while I fumbled with the thermostat. My daughter joked, “Dad, are we waiting for the AC or for the aliens to land?” That moment taught me the importance of understanding your AC’s control panel.
Carrier air conditioners are designed with user-friendly features, but only if you know how to unlock them. Whether you have a wall-mounted thermostat, a smart thermostat, or a built-in control panel, the key is knowing which button does what. In this guide, I’ll walk you through every step, share real-life tips, and help you avoid the “alien spaceship” confusion. By the end, you’ll feel confident adjusting settings, troubleshooting issues, and even saving on energy bills—all without calling a technician.
Getting Started: Identifying Your Control Panel Type
Types of Carrier Control Panels
Carrier offers several control panel styles. Knowing which one you have is the first step to mastering it. Here’s a quick rundown:
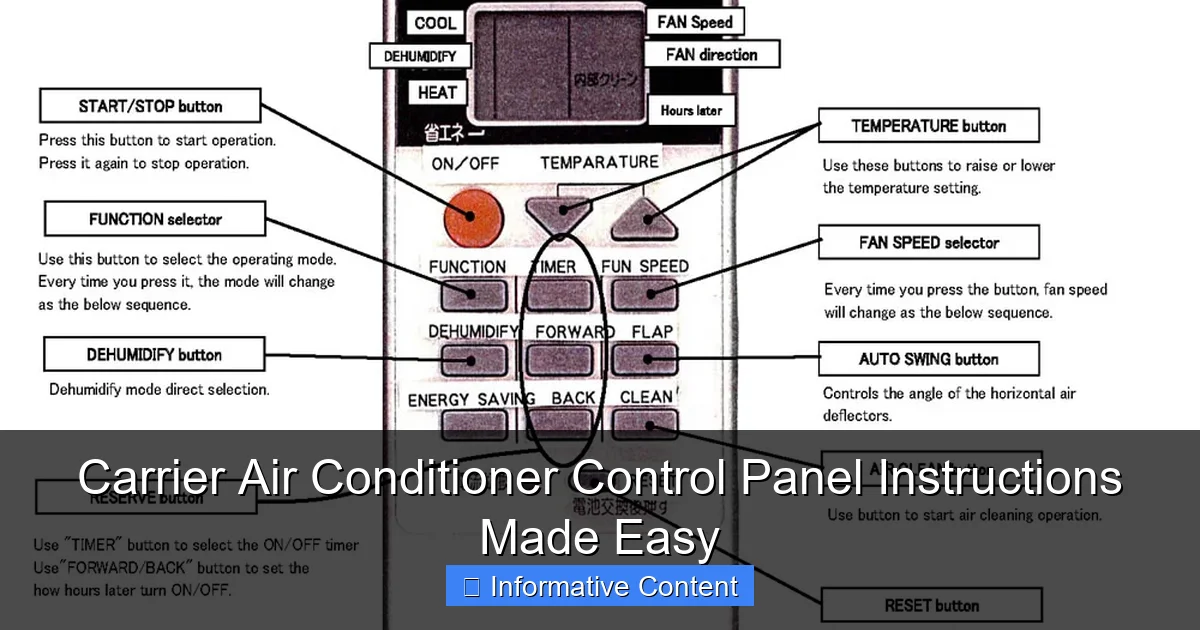
Visual guide about carrier air conditioner control panel instructions
Image source: tokuzato-hsg.jp
- Standard Thermostat (e.g., Carrier Comfort Series): A simple digital screen with physical buttons. Think: “Set temperature, press ‘On,’ done.”
- Programmable Thermostat (e.g., Carrier Infinity Series): Allows scheduling for different times/days. Great for energy savings.
- Smart Thermostat (e.g., Carrier Infinity Touch): Connects to Wi-Fi, integrates with apps, and learns your habits. Like a personal AC assistant.
- Built-in Unit Controls (e.g., ductless mini-split): Controls on the indoor/outdoor unit itself. Common in apartments or retrofits.
Example: If you see a sleek touchscreen with Wi-Fi symbols, you’re likely using a smart thermostat. If it’s a small box with up/down arrows, it’s probably a standard or programmable model.
Locating the Control Panel
Most Carrier systems have the control panel in a central, accessible spot—like your living room or hallway. But here’s a common mistake: not checking the unit itself. For ductless systems, the indoor unit (the one with the vents) often has a control panel. If your wall thermostat is unresponsive, check the unit’s display. I once spent 20 minutes troubleshooting a “broken” thermostat, only to realize the indoor unit’s power button was off. Embarrassing? Yes. Fixable? Absolutely.
Basic Controls: What Each Button and Icon Means
Essential Buttons and Their Functions
Let’s decode the most common buttons. No jargon—just plain English.
- Power Button: Turns the AC on/off. Look for a symbol like a circle with a vertical line (⏻). Press once to start, again to stop.
- Mode Button: Cycles through cooling, heating, fan-only, and auto modes. The icon often shows a snowflake (cooling), sun (heating), or fan blades (fan-only).
- Temperature Up/Down Arrows: Adjusts the target temperature. Hold the button to change it faster.
- Fan Speed: Controls airflow intensity. Options: Low, Medium, High, or Auto. Auto adjusts fan speed based on cooling needs.
- Timer/Schedule: Sets on/off times. Found on programmable/smart thermostats. Icon: a clock or calendar.
- Hold/Override: Keeps the current settings active, even if a schedule is running. Handy for unexpected guests or heatwaves.
Tip: If you’re unsure what a button does, press it once and watch the screen. Most panels show a brief message (e.g., “Cooling On” or “Fan: High”).
Understanding the Display Screen
The screen is your AC’s “voice.” Here’s what to look for:
- Current Temperature: Usually displayed large and central. This is your room’s actual temperature.
- Set Temperature: Smaller text, often below or beside the current temp. This is what you want the room to reach.
- Mode Icon: A snowflake, sun, or fan symbol shows the active mode.
- Filter Reminder: A clock or filter icon that flashes when it’s time to clean/replace the air filter (usually every 3–6 months).
- Wi-Fi/Network Symbol: Only on smart thermostats. A signal bar or “Wi-Fi” text indicates connectivity.
Real-life example: My neighbor, Sarah, noticed her AC wasn’t cooling. She checked the screen and saw the “fan-only” icon was on. A quick press of the Mode button fixed it. No repair call needed!
Advanced Settings: Scheduling, Smart Features, and Energy Saving
Programming Your Thermostat (For Programmable & Smart Models)
Scheduling is where you save money. Here’s how:
- Access the Schedule Menu: Press “Menu” → “Schedule” or “Program.”
- Set Time Periods: Most models use 4 periods:
- Wake: When you wake up.
- Leave: When you leave for work.
- Return: When you come home.
- Sleep: When you go to bed.
- Adjust Temperatures: Set cooler temps for “Wake” and “Return,” warmer for “Leave” and “Sleep.” For example:
- Wake: 72°F (6:00 AM)
- Leave: 78°F (8:00 AM)
- Return: 72°F (5:00 PM)
- Sleep: 75°F (10:00 PM)
- Save and Confirm: Press “Save” or “Done.”
Pro tip: Use the “Hold” button sparingly. If you override the schedule daily, you’ll miss out on energy savings. Instead, adjust the schedule to match your routine.
Smart Thermostat Features (Wi-Fi, Apps, and Automation)
Smart thermostats like the Carrier Infinity Touch do more than schedule. They:
- Connect to Apps: Use the Carrier app (iOS/Android) to control your AC from anywhere. Forgot to turn it on before leaving work? Open the app and cool your home on the drive home.
- Learn Your Habits: Some models (e.g., Carrier Infinity with Alexa) adjust temps based on your usage patterns.
- Provide Energy Reports: Monthly emails show how much energy you used and how to improve.
- Integrate with Voice Assistants: Say, “Alexa, set the living room to 70°F,” and it’s done.
Example: I use the app to pre-cool my home on summer afternoons. When I walk in, it’s already comfortable—and my energy bill dropped 15% after I started scheduling.
Energy-Saving Tips
Your control panel is a money-saving tool. Try these:
- Use Auto Mode: The AC adjusts fan speed based on demand, using less energy than “High” mode.
- Set a “Comfort Zone”: Keep temps between 72–78°F. Each degree below 72°F increases energy use by 6–8%.
- Enable “Smart Recovery”: On programmable thermostats, this feature starts cooling early so the room reaches your target temp exactly when needed. No waiting.
- Turn Off Unused Features: If you don’t use heating, disable the “Auto” mode to prevent the heat pump from activating.
Troubleshooting Common Control Panel Issues
Panel Not Responding or Blank Screen
First, check the power source. Is the thermostat on? Is the circuit breaker for the AC tripped? Here’s a quick checklist:
- Check the Batteries: Most thermostats have backup batteries. Replace them every 1–2 years.
- Inspect the Wiring: If you’re comfortable, turn off power at the breaker, then check if wires are loose or disconnected. (If not, call a pro.)
- Reset the System: Turn the AC off at the thermostat, wait 30 seconds, then turn it back on. This often fixes glitches.
My story: My thermostat once froze after a power outage. A simple reset (off → wait → on) brought it back to life. Saved me $100 on a service call.
Incorrect Temperature Readings
If the screen shows 70°F but the room feels like 80°F, the thermostat might be in the wrong spot. Avoid:
- Sunlight: Place the thermostat away from windows or lamps.
- Drafts: Don’t install it near doors or vents.
- Heat Sources: Keep it away from kitchens, TVs, or electronics.
Tip: For built-in unit controls, clean the sensor (a small hole near the display) with a soft brush. Dust can skew readings.
Wi-Fi/Network Connectivity Problems (Smart Models)
No internet? No problem. Try:
- Reboot the Router: Unplug it, wait 30 seconds, plug it back in.
- Reconnect the Thermostat: Go to the thermostat’s Wi-Fi settings and re-enter your network details.
- Check Signal Strength: If the signal is weak, move the thermostat closer to the router or use a Wi-Fi extender.
Maintenance and Care: Keeping Your Control Panel in Top Shape
Regular Cleaning and Dusting
Dust and grime can interfere with sensors and buttons. Clean your panel:
- Monthly: Wipe the screen and buttons with a damp microfiber cloth. Avoid harsh chemicals.
- Every 3 Months: Remove the thermostat faceplate (if possible) and vacuum dust from the interior.
- For Built-in Units: Use a soft brush to clean around the display and vents.
Caution: Never use water or cleaning sprays directly on the panel. Moisture can damage electronics.
Filter Replacement and System Checks
A clogged filter forces your AC to work harder, which can cause control panel errors. Follow these steps:
- Check the Filter: Look for a filter icon on the display or set a phone reminder every 3 months.
- Replace It: Most Carrier filters are easy to swap. Open the return air vent, pull out the old filter, and slide in the new one. (Check your model’s manual for size.)
- Inspect the System: Once a year, check for:
- Leaky ducts
- Frozen coils
- Unusual noises
Data point: According to the U.S. Department of Energy, replacing a dirty filter can reduce energy use by 5–15%.
When to Call a Professional
Some issues need expert help. Call a technician if you notice:
- Frequent Error Codes: Like “E1,” “E5,” or “No Signal.”
- Burning Smell or Sparks: Turn off the system immediately.
- System Not Cooling After Basic Fixes: Could indicate refrigerant leaks or compressor issues.
Data Table: Common Carrier Control Panel Models and Features
| Model | Type | Key Features | Best For |
|---|---|---|---|
| Carrier Comfort Series | Standard | Simple interface, 5-day scheduling, filter reminder | Basic cooling needs, budget-friendly |
| Carrier Infinity Series | Programmable | 7-day scheduling, humidity control, remote access via app | Energy savings, consistent comfort |
| Carrier Infinity Touch | Smart | Wi-Fi, voice control, energy reports, learning thermostat | Tech-savvy users, automation |
| Carrier Ductless Mini-Split Controls | Built-in | On-unit buttons, remote control, sleep mode | Rooms without ductwork |
Conclusion: Your Carrier Control Panel, Simplified
Your Carrier air conditioner’s control panel isn’t a mystery—it’s a tool. With this guide, you’ve learned to identify your model, master basic and advanced settings, troubleshoot issues, and keep it running smoothly. No more sweating through summer afternoons or overpaying for repairs.
Remember: Start simple. Focus on the power, mode, and temperature buttons first. Then, explore scheduling and smart features. And if you ever feel stuck? Refer back to this guide. You’ve got this. Your home’s comfort is just a few button presses away—no alien technology required.
Frequently Asked Questions
How do I turn on my Carrier air conditioner using the control panel?
To turn on your Carrier air conditioner, locate the power button (usually marked with a circular icon) on the control panel and press it. Ensure the mode is set to “Cool” and adjust the temperature using the up/down arrows. Refer to your Carrier air conditioner control panel instructions for model-specific details.
Why is my Carrier AC not responding to the control panel settings?
If your AC isn’t responding, check if the unit is in sleep mode, has a locked keypad, or if there’s a power issue. Reset the control panel by turning it off for 30 seconds, then back on. If problems persist, consult your Carrier air conditioner control panel instructions for troubleshooting steps.
How do I switch between cooling and fan-only modes on my Carrier AC?
Press the “Mode” button on the control panel until the display shows “Cool” or “Fan.” In cooling mode, the AC will lower the room temperature, while fan-only circulates air without cooling. The exact steps may vary, so check your model’s manual for guidance.
What do the error codes on my Carrier control panel mean?
Error codes (e.g., “E1” or “F1”) indicate specific issues like sensor failures or refrigerant leaks. Cross-reference the code with your user manual’s troubleshooting section or visit Carrier’s support site. Never ignore error codes, as they may require professional repair.
How do I set a timer for my Carrier air conditioner?
Press the “Timer” button, then use the up/down arrows to set the desired on/off time. Some models allow separate timers for weekdays and weekends. Detailed steps can be found in your Carrier air conditioner control panel instructions.
Why is my Carrier control panel displaying an incorrect temperature?
This could be due to a faulty sensor or incorrect placement of the unit (e.g., near a heat source). Try recalibrating the sensor via the control panel’s settings or reset the unit. If the issue continues, contact Carrier customer support for assistance.