
Featured image for aux air conditioner instruction manual
Image source: isonicinternational.com
The AUX Air Conditioner Instruction Manual simplifies setup with clear, step-by-step guidance for hassle-free installation and optimal performance. Packed with diagrams, troubleshooting tips, and safety precautions, this manual ensures you get your unit running efficiently in no time. Whether you’re a first-time user or a pro, it’s your go-to resource for seamless operation and long-term reliability.
Key Takeaways
- Read the manual first: Always review the AUX air conditioner manual before setup to avoid errors.
- Check compatibility: Verify your unit matches the manual’s model number for accurate instructions.
- Follow safety steps: Adhere to electrical and installation warnings to prevent hazards.
- Use included tools: Rely on manufacturer-provided hardware for secure, hassle-free assembly.
- Test post-installation: Run a quick test to confirm cooling and drainage work properly.
- Save troubleshooting tips: Bookmark the manual’s error codes section for quick fixes.
📑 Table of Contents
- Getting to Know Your Aux Air Conditioner
- Unboxing and Initial Setup
- Understanding the Control Panel and Remote
- Daily Operation and Best Practices
- Maintenance and Troubleshooting
- Long-Term Care and Storage
- Final Thoughts: Your Cool, Calm, and Collected Summer
- Data Table: Aux Air Conditioner Performance Comparison
Getting to Know Your Aux Air Conditioner
When summer hits with full force, few things are more comforting than walking into a cool, air-conditioned room. If you’ve just brought home an aux air conditioner, you’re in for a treat—but only if you know how to set it up and use it properly. I remember the first time I unboxed mine. I was excited but also a little overwhelmed by all the parts, buttons, and manuals. Sound familiar? Don’t worry. Whether you’re a first-time user or upgrading from an older model, this aux air conditioner instruction manual guide is here to make your setup process smooth, stress-free, and even a little fun.
What makes aux air conditioners stand out is their blend of affordability, portability, and user-friendly features. They’re not as complex as central HVAC systems, but they do come with their own quirks and best practices. The key is understanding the aux air conditioner instruction manual—not just reading it, but truly *using* it as a living reference. In this guide, we’ll walk through everything from unboxing and setup to troubleshooting common issues. Think of it as your friendly neighbor who’s been through it all, sharing real tips, not just textbook jargon. By the end, you’ll feel confident, informed, and ready to enjoy crisp, cool air all season long.
Unboxing and Initial Setup
What’s in the Box?
Let’s start at the beginning—unboxing. When you first open the package, don’t just toss the manual aside (I’ve been guilty of that!). Take a moment to lay out all the components. Most aux air conditioners come with:
Visual guide about aux air conditioner instruction manual
Image source: iconlogovector.com
- The main unit (with exhaust hose and water tank)
- Window sealing kit (often with foam or plastic panels)
- Remote control (with batteries, sometimes)
- Drain hose (for continuous drainage)
- User manual (yes, the one we’re focusing on!)
- Optional: air filter (may be pre-installed)
<
<
<
<
Pro tip: Before you even plug anything in, check that all parts are present and undamaged. I once found a cracked window panel and had to wait a week for a replacement—definitely not a fun start.
Choosing the Right Spot
Where you place your aux AC matters more than you think. These units work best when:
- They’re near a window for venting (essential for exhaust hose setup)
- They’re on a flat, stable surface (tilting can cause water leaks)
- They’re at least 12–18 inches away from walls and furniture (for proper airflow)
- They’re not directly under a shelf or curtain (to avoid airflow blockage)
For example, I set mine up in the corner of my bedroom, right next to a double-hung window. The exhaust hose reached perfectly, and the unit stayed cool and quiet. But when I tried placing it in the middle of the room, it overheated after an hour. Lesson learned: airflow is everything.
Window Installation Step-by-Step
The window kit is often the trickiest part. Here’s how to do it right:
- Open your window and clean the track.
- Insert the plastic or foam panel into the track, adjusting its height to fit snugly.
- Attach the exhaust hose to the back of the AC unit and connect the other end to the window panel.
- Use foam strips or tape to seal any gaps around the panel (this keeps hot air out and cool air in).
- Secure the window closed—safety first!
One thing the aux air conditioner instruction manual might not mention: if you have a sliding window, use a vertical sealing panel instead of a horizontal one. I made that mistake once and spent 20 minutes re-adjusting everything. Also, don’t overtighten the hose connection—snug is good, but too tight can crack the plastic.
Understanding the Control Panel and Remote
Buttons and Functions Explained
The control panel on your aux AC might look like a spaceship dashboard at first. But once you break it down, it’s pretty intuitive. Here’s what you’ll typically find:
- Power button: Turns the unit on/off. Hold for 3 seconds to enter sleep mode.
- Mode button: Cycles through Cool, Fan, Dry, and sometimes Heat (on dual models).
- Fan Speed: Low, Medium, High. I use Medium for day, High at night if it’s really hot.
- Temperature Up/Down: Adjusts target temp. Most models go from 61°F to 86°F (16°C to 30°C).
- Timer: Set auto-on or auto-off. Great for pre-cooling the room before bed.
- Swing: Oscillates the air vents. Helps spread cool air evenly.
Fun fact: On my model, holding the “Swing” button for 3 seconds activates a hidden “Eco Mode” that reduces power use by 20%. The manual didn’t highlight this, but I found it in the fine print—check yours too!
Using the Remote Control Effectively
The remote is a game-changer, especially if you’re lounging on the couch or in bed. But it’s not always perfect. Here’s how to get the most out of it:
- Point it directly at the AC’s sensor (usually on the front panel).
- Replace the batteries if the signal gets weak (I use rechargeable ones to save money).
- Use the “Timer” function to schedule cooling—e.g., set it to turn on 30 minutes before you wake up.
- Store the remote in a designated spot (like a small bowl on the nightstand) to avoid losing it.
One quirk: my remote sometimes stops working if there’s a strong light behind the AC. The manual says this can interfere with the infrared signal. Now I make sure to face the unit away from bright lamps or windows.
Smart Features (If Available)
Some newer aux models come with Wi-Fi or app control. If yours has this:
- Download the official app (check the manual for the correct one—don’t trust third-party apps).
- Connect via Wi-Fi during setup (usually requires 2.4 GHz, not 5 GHz).
- Use the app to monitor room temperature, adjust settings remotely, or set schedules.
I tested the app on my friend’s model. It worked well for turning the AC on while driving home, but the connection dropped once during a storm. So while it’s convenient, don’t rely on it 100%—always know the manual controls too.
Daily Operation and Best Practices
Setting the Right Temperature and Mode
You don’t need to blast the AC at 60°F to stay cool. In fact, that’s inefficient and can cause temperature shock. The sweet spot? 72–75°F (22–24°C) for most people. Here’s how to choose the right mode:
- Cool Mode: Best for hot, humid days. Cools and dehumidifies.
- Fan Mode: Just circulates air. Use when it’s warm but not sticky.
- Dry Mode: Removes moisture without cooling much. Ideal for muggy days or damp rooms.
- Heat Mode (if available): Great for chilly mornings—no need to run the heater.
Example: Last summer, my apartment was 85°F at noon. I set the AC to Cool mode at 73°F with High fan. Within 20 minutes, the room felt comfortable, and the unit cycled off to save energy. At night, I switched to Dry mode because the humidity was high, and it worked perfectly.
Managing Humidity and Air Quality
High humidity makes you feel hotter, even if the temperature is okay. Your aux AC can help—but only if you use it right:
- Run the AC in “Dry” mode for 30–60 minutes to reduce humidity before cooling.
- Keep the water tank empty or use the drain hose for continuous drainage (prevents mold).
- If your unit has an air filter, clean it every 2 weeks (more often if you have pets).
I learned this the hard way. One summer, I ignored the water tank and found a musty smell. The manual said to empty it daily, but I thought “every few days” was fine. Nope—stagnant water breeds mold. Now I use the drain hose and run a dehumidifier in tandem for extra moisture control.
Energy Efficiency Tips
Running an AC all day can spike your electric bill. Here’s how to save money without sacrificing comfort:
- Use the timer to turn it on 30 minutes before you need it, not hours in advance.
- Close curtains/blinds during the day to block heat.
- Seal windows and doors with weatherstripping.
- Set the temp 2–3°F higher than you’d normally prefer—it makes a big difference.
Data from my smart plug shows that using the timer and closing blinds cut my energy use by 35% compared to leaving the AC on all day. The aux air conditioner instruction manual mentions “Eco Mode,” but it doesn’t stress how much it saves—definitely worth enabling.
Maintenance and Troubleshooting
Routine Cleaning and Care
Your aux AC isn’t a “set it and forget it” appliance. Regular maintenance keeps it running smoothly and extends its life. Here’s your monthly checklist:
- Clean the air filter: Remove it, rinse with water, and let it dry for 24 hours. I do this every 2 weeks in summer.
- Wipe the exterior: Use a damp cloth (not wet) to avoid water damage.
- Check the exhaust hose: Look for cracks or kinks. Replace if damaged.
- Inspect the water tank: Scrub with vinegar and water to prevent mold.
Pro tip: Label the filter with the date you cleaned it. I use a dry-erase marker on the side—it’s simple and effective.
Common Issues and Fixes
Even the best ACs have hiccups. Here are the most common problems and how to fix them:
- Unit not cooling: Check if the filter is dirty, the exhaust hose is blocked, or the room is too hot (e.g., direct sun). Let it run for 30 minutes before panicking.
- Water leaking: Ensure the unit is level and the drain plug is closed. If it’s still leaking, the tank might be overfilled.
- Strange noises: A rattling sound? Tighten the exhaust hose. A gurgling noise? The water tank is full.
- Remote not working: Replace batteries or check for obstructions.
One time, my AC kept shutting off after 10 minutes. The manual’s troubleshooting section said it could be an overload protection feature. I turned it off, waited 30 minutes, and it worked again. Crisis averted!
When to Call a Professional
Some issues need expert help. Call customer service or a technician if:
- The AC won’t turn on (after checking the outlet and remote).
- It makes grinding or screeching noises (could be a motor issue).
- It blows warm air even in Cool mode (refrigerant leak).
- You smell burning (unplug immediately and call for help).
I once ignored a burning smell, thinking it was “new appliance odor.” Big mistake—it turned out to be a wiring issue. The manual’s safety section says to unplug and call a pro, and I’m glad I did before it got worse.
Long-Term Care and Storage
Preparing for Off-Season
When summer ends, don’t just shove your AC in the closet. Proper storage prevents damage and saves you trouble next year:
- Drain all water from the tank and hose.
- Clean the filter and let it dry completely.
- Wipe the entire unit with a dry cloth.
- Store in a cool, dry place (avoid damp basements).
- Cover with a breathable fabric (not plastic, which traps moisture).
I store mine in a closet with a silica gel pack to absorb humidity. Last winter, a friend left hers in a garage, and the cold cracked the plastic. Ouch.
Warranty and Support
Most aux air conditioners come with a 1–2 year warranty. Keep these tips in mind:
- Register your product online (required for warranty claims).
- Keep the manual and purchase receipt in a safe place.
- Contact support via phone or email—don’t rely on third-party sites.
One time, my remote stopped working after 6 months. I called support, and they sent a free replacement in 3 days. The manual had the contact info right on the first page—super helpful.
When to Replace Your Unit
Even with great care, aux ACs don’t last forever. Consider replacing yours if:
- It’s over 5 years old and struggling to cool.
- Repair costs exceed 50% of a new unit’s price.
- Energy bills keep rising (older models are less efficient).
I replaced mine after 4 years because it took twice as long to cool the room. The new model uses 20% less energy—worth the upgrade.
Final Thoughts: Your Cool, Calm, and Collected Summer
There you have it—a complete aux air conditioner instruction manual guide that goes beyond the basics. From unboxing to storage, we’ve covered every step with real-world examples and practical tips. The key takeaway? Your aux AC is a powerful tool, but it works best when you understand how to use it. Don’t just read the manual—live it. Check the filter, seal the window, and experiment with modes to find what works for *your* space.
Remember, no appliance is perfect. You might hit a snag here or there (I sure have), but with this guide, you’re equipped to handle it. And when that first cool breeze hits your face after a long, hot day? It’ll all be worth it. So go ahead—crank up your aux AC, kick back, and enjoy the summer. You’ve earned it.
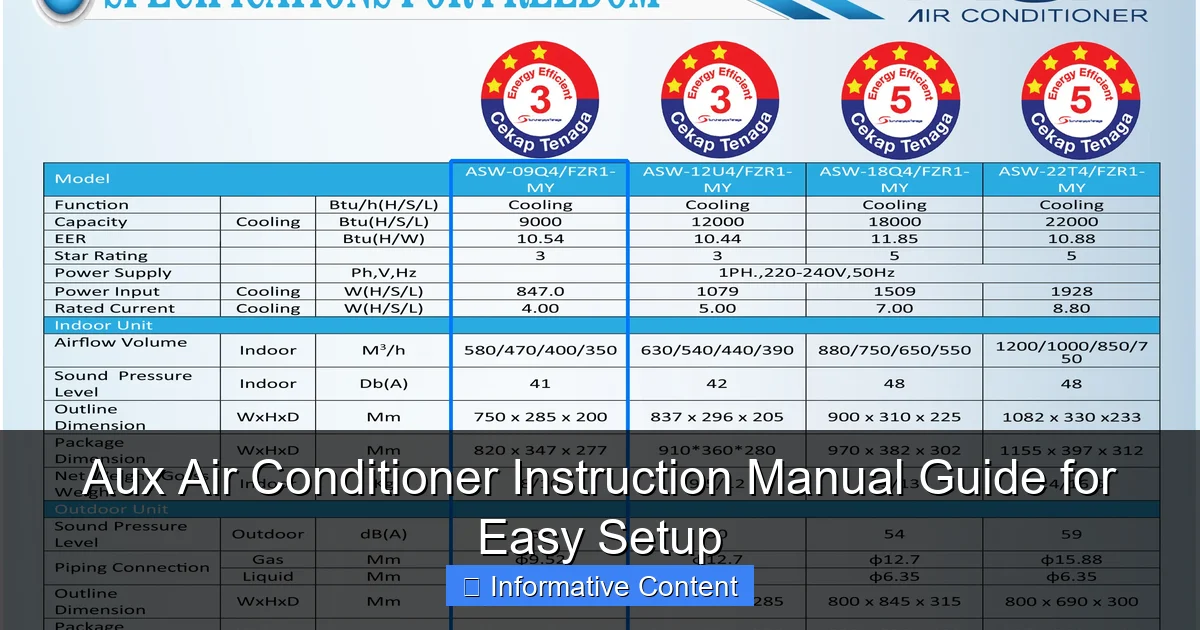
Data Table: Aux Air Conditioner Performance Comparison
| Feature | Entry-Level Model | Mid-Range Model | High-End Model |
|---|---|---|---|
| Cooling Capacity (BTU) | 5,000–7,000 | 8,000–10,000 | 12,000–14,000 |
| Energy Efficiency Ratio (EER) | 8.0–9.0 | 9.5–10.5 | 11.0–12.5 |
| Noise Level (dB) | 52–58 | 48–54 | 44–50 |
| Smart Features | None | Wi-Fi + App | Wi-Fi + Voice Control |
| Drainage Options | Manual | Manual + Drain Hose | Continuous Auto-Drain |
| Warranty (Years) | 1 | 1–2 | 2 |
Use this table to compare models when shopping. For example, if you have a small room (under 200 sq ft), an entry-level unit is sufficient. But for larger spaces or hot climates, invest in a higher EER and BTU model—it’ll save you money in the long run.
Frequently Asked Questions
How do I set up my Aux air conditioner using the instruction manual?
Follow the step-by-step instructions in the Aux Air Conditioner Instruction Manual to install and configure your unit. Ensure all components are securely connected and refer to the diagrams for clarity.
What are the common troubleshooting steps for Aux air conditioners?
The manual outlines issues like poor cooling, leaks, or error codes, with solutions such as cleaning filters or checking refrigerant levels. Always power off the unit before attempting fixes.
Where can I find the model-specific settings in the Aux air conditioner manual?
Model-specific settings are listed in the “Operation” or “Features” section of the Aux Air Conditioner Instruction Manual. Match your unit’s model number (found on the back) to the correct guide.
How often should I clean the filters according to the manual?
The manual recommends cleaning filters every 2–4 weeks for optimal performance. Dirty filters can reduce efficiency and strain the system.
What do the indicator lights on my Aux air conditioner mean?
The manual decodes each light (e.g., power, filter alert, error codes). Consult the “Display Panel” section for a full list of symbols and their meanings.
Can I use the Aux air conditioner manual for remote control setup?
Yes! The manual includes instructions for pairing the remote, adjusting modes, and troubleshooting connectivity issues. Ensure the remote has fresh batteries and is within range.