

Featured image for airwell air conditioner remote instructions
Image source: cdn.shopify.com
Master your Airwell air conditioner with ease using these simple remote instructions. From adjusting temperature and fan speed to setting timers and modes, this guide breaks down every function for quick, hassle-free control. Whether you’re a first-time user or troubleshooting issues, clear steps ensure optimal comfort at the touch of a button.
Key Takeaways
- Master basic functions: Learn power, mode, and fan speed buttons for daily use.
- Set timers effortlessly: Use timer settings to automate on/off cycles and save energy.
- Optimize sleep mode: Enable sleep mode for quieter, efficient cooling at night.
- Navigate error codes: Check the manual to quickly resolve common remote error messages.
- Replace batteries properly: Always use fresh batteries and align polarity correctly for reliability.
- Pair remote correctly: Ensure the remote and AC unit are paired for seamless control.
📑 Table of Contents
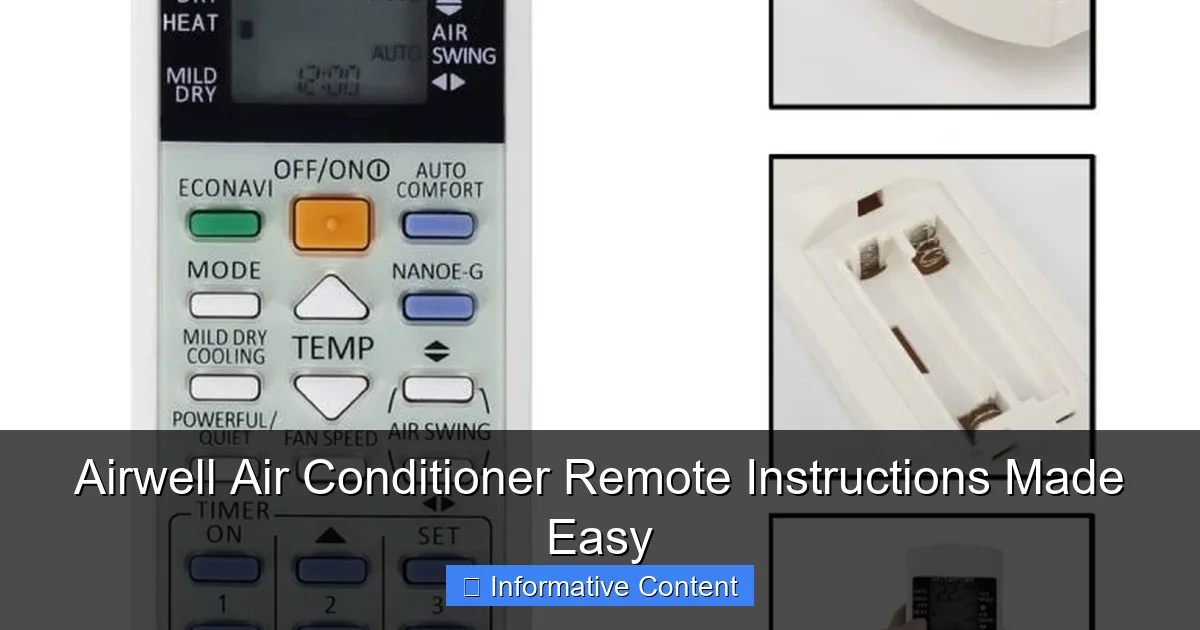
Understanding Your Airwell Air Conditioner Remote
Let’s be honest—air conditioner remotes can be confusing. You press a button, and nothing happens. Or worse, something happens, but not what you intended. I’ve been there. Standing in front of my Airwell AC, remote in hand, staring at a screen full of symbols I couldn’t decipher. It felt like I needed a degree in HVAC just to turn the darn thing on. But after a few trial-and-error sessions (and a little help from the manual), I realized the Airwell air conditioner remote isn’t as intimidating as it seems.
The key is knowing what each button does and how to use them effectively. Whether you’re a first-time Airwell user or just need a refresher, this guide breaks down everything you need to know about your remote. We’ll cover the basics, troubleshoot common issues, and even share some pro tips to make your AC experience smoother. Think of this as your friendly, no-nonsense companion to mastering the Airwell air conditioner remote instructions.
Getting Familiar with the Remote Layout
When you first pick up your Airwell remote, it might look like a spaceship control panel. But don’t worry—each button has a purpose. Here’s a quick rundown of the most common sections:
- Power Button: The big red or green button at the top. Press it to turn the AC on or off.
- Mode Button: Cycles through cooling, heating, fan, dehumidify, and auto modes. The symbol usually looks like a sun (cooling), snowflake (heating), or fan blades.
- Temperature Controls: Up and down arrows to adjust the desired temperature. Most models go from 16°C to 30°C (60°F to 86°F).
- Fan Speed: Lets you choose low, medium, high, or auto fan speed. Some remotes have a dedicated button; others combine it with the mode or swing controls.
- Swing/Louver Control: Controls the direction of the airflow. Great for evenly cooling a room or avoiding direct drafts.
- Timer: Sets the AC to turn on or off automatically. Useful for energy savings or pre-cooling a room before you get home.
- Sleep Mode: Gradually adjusts the temperature for better comfort during the night.
For example, if you’re in a hot room and want to cool it down fast, you’d:
- Press the power button to turn the AC on.
- Set the mode to “cool” using the mode button.
- Adjust the temperature to 22°C (72°F) with the up/down arrows.
- Set the fan speed to “high” for quick cooling.
Pro tip: Take a photo of your remote with your phone. This way, if you ever lose the manual or forget what a button does, you’ll have a visual reference handy.
Common Symbols and What They Mean
Airwell remotes use universal symbols, but they can still be confusing if you’re not used to them. Here’s a quick guide to the most common ones:
- Sun icon: Cooling mode
- Snowflake: Heating mode (on models with heat pump functionality)
- Fan blades: Fan-only mode (no cooling or heating)
- Droplet: Dehumidify mode (reduces humidity without cooling much)
- Clock: Timer function
- Moon: Sleep mode
- Waves: Swing or louver control
One user shared with me: “I thought the snowflake was for cooling until I accidentally turned on heating in the middle of summer!” That’s a common mix-up, especially in dual-mode systems. Always double-check the mode icon on the display before assuming it’s set correctly.
Step-by-Step Guide to Using the Remote
Turning On and Off the Air Conditioner
Let’s start with the basics—turning your AC on and off. Seems simple, right? But even this can trip people up if they’re not careful.
Visual guide about airwell air conditioner remote instructions
Image source: acsupportspoint.com
To turn on:
- Point the remote at the AC unit (within 8-10 meters, with no obstructions).
- Press the power button (usually the largest button at the top).
- Wait for the AC to respond—you should hear a beep and see the display light up.
To turn off:
- Press the power button again.
- The AC will shut down, and the display may show “OFF” or go dark.
Common issue: The remote doesn’t respond. Before panicking, check these:
- Are the batteries fresh? Replace them if they’re weak.
- Is the remote pointed directly at the AC? Even a slight angle can block the signal.
- Is there a strong light source (like a lamp or sunlight) interfering with the infrared signal? Try moving to a darker spot.
One user told me: “I thought my remote was broken until I realized my cat was sitting on the AC unit, blocking the receiver!” Always make sure the AC’s sensor is clear.
Setting the Temperature and Mode
Now that your AC is on, let’s set the right temperature and mode.
Step 1: Choose your mode
- Press the mode button repeatedly until the display shows your desired mode (cool, heat, fan, dehumidify, or auto).
- For most summer days, “cool” is the go-to mode. In winter, “heat” works if your model has a heat pump. “Auto” lets the AC decide based on the room temperature.
Step 2: Adjust the temperature
- Use the up/down arrows to set the temperature. For cooling, 24-26°C (75-78°F) is comfortable for most people. Lower isn’t always better—it just uses more energy.
- Tip: Set the temperature a few degrees higher than you think you need. The AC will cool the room faster and shut off sooner, saving energy.
Example: You want to cool your living room to 24°C. Press the mode button until you see the sun icon (cooling), then press the down arrow until the display shows “24.” The AC will start cooling and maintain that temperature.
Adjusting Fan Speed and Airflow
Fan speed affects how quickly the room cools and how much noise you hear.
Fan speed options:
- Low: Quiet but slow cooling. Great for nighttime or small rooms.
- Medium: Balanced noise and cooling. Good for general use.
- High: Fast cooling but louder. Best for hot days or large rooms.
- Auto: The AC adjusts the fan speed based on the room temperature. Saves energy and keeps the noise level consistent.
To adjust:
- Press the fan speed button (or the “+”/“-” button if it’s combined with temperature).
- Cycle through the options until you see your preferred speed on the display.
Airflow direction (swing mode):
- Press the swing button (usually shows waves or a fan with arrows).
- Choose “horizontal swing” (side-to-side) or “vertical swing” (up-and-down).
- For even cooling, use both. For direct airflow, turn swing off and manually adjust the louvers.
One user shared: “I used to set the fan to high all the time, but it was so loud I couldn’t hear the TV. Switching to medium made a huge difference!”
Advanced Features and Settings
Using the Timer Function
The timer is a game-changer for energy savings and comfort. It lets you schedule your AC to turn on or off automatically.
To set the timer:
- Press the timer button (usually a clock icon).
- Use the up/down arrows to set the time (in hours). For example, set “2” to turn the AC off after 2 hours.
- Press the timer button again to confirm.
- To set a start time, press and hold the timer button, then adjust the time.
Example uses:
- Nighttime: Set the timer to turn the AC off after 4 hours. No more waking up cold!
- Morning: Set it to turn on 30 minutes before you wake up. The room will be cool when you get up.
- Leaving home: Set it to turn off after you leave. Saves energy while keeping the room comfortable.
Pro tip: Use the timer with the sleep mode for the best results. The AC will gradually adjust the temperature and shut off when the timer ends.
Sleep Mode for Better Nighttime Comfort
Sleep mode is designed to keep you comfortable without overcooling the room.
How it works:
- The AC gradually raises the temperature by 1-2°C (2-4°F) every hour for the first few hours.
- After 3-4 hours, it stabilizes at a slightly warmer temperature (usually 1-2°C higher than your initial setting).
- Reduces fan speed for quieter operation.
To activate:
- Press the sleep mode button (usually a moon icon).
- The display will show “SLEEP” or a moon symbol.
Example: You set the AC to 22°C before bed. After 2 hours, it might adjust to 23°C. By morning, it’s at 24°C—cool enough to sleep, but not so cold that you wake up shivering.
Note: Sleep mode only works in cooling mode. If your AC has heating, it won’t activate sleep mode in heat mode.
Eco and Turbo Modes (If Available)
Some Airwell models have extra features like eco and turbo modes.
Eco mode:
- Reduces energy consumption by slightly raising the target temperature (e.g., from 24°C to 26°C).
- Uses less power and saves money on electricity bills.
- Great for when you’re not in the room or want to reduce energy use.
Turbo mode:
- Boosts cooling or heating for rapid temperature changes.
- Uses maximum fan speed and compressor power.
- Best for hot days or when you need to cool a room quickly.
To use:
- Press the eco or turbo button (if your remote has them).
- The display will show “ECO” or “TURBO.”
User tip: “I use turbo mode for 15 minutes when I get home, then switch to normal mode. The room cools fast without the noise lasting all evening.”
Troubleshooting Common Remote Issues
Remote Not Responding
Nothing’s more frustrating than a remote that won’t work. Here’s how to fix it:
1. Check the batteries
- Replace the batteries (usually 2 AAA or AA). Even if the remote seems to work, weak batteries can cause intermittent issues.
- Make sure the batteries are inserted correctly (positive and negative terminals aligned).
2. Clean the remote and AC sensor
- Dust or dirt on the remote’s infrared emitter or the AC’s sensor can block the signal.
- Wipe the remote’s front and the AC’s sensor with a soft, dry cloth.
3. Check for interference
- Strong light (sunlight, lamps) can interfere with infrared signals.
- Move to a darker spot or shield the remote from direct light.
4. Reset the remote
- Remove the batteries, wait 30 seconds, then reinsert them.
- This can clear any glitches in the remote’s memory.
5. Test with another remote (if available)
- If a friend has the same model, borrow their remote to see if it works.
- If it does, your remote is the problem. If not, the AC’s sensor might be faulty.
Display Not Showing Correct Settings
Sometimes the remote shows the wrong temperature or mode. Here’s why:
1. Sensor issues
- The remote has a temperature sensor. If it’s near a heat source (lamp, window, body heat), it might read the wrong temperature.
- Hold the remote away from heat sources or use the AC’s built-in sensor (if available).
2. Mode confusion
- If you press the mode button too fast, it might skip a mode or not register.
- Press the button slowly and wait for the display to change.
3. Software glitch
- Reset the remote (remove batteries) and restart the AC.
- Sometimes a simple reset fixes display issues.
Pro Tips for Optimal AC Performance
Energy-Saving Settings
Want to keep your electricity bills low? Try these settings:
1. Use eco mode
- Reduces energy use by 10-20%.
- Best for when you’re not in the room or want to save energy.
2. Set a higher temperature
- Every 1°C increase saves 6-8% on energy.
- 26°C (78°F) is comfortable for most people.
3. Use the timer
- Turn the AC off when you’re not home.
- Set it to turn on 30 minutes before you return.
4. Keep the room sealed
- Close doors, windows, and curtains to prevent hot air from entering.
- Use weather stripping to seal gaps.
Maintenance Tips for Long-Lasting Performance
Your remote and AC need a little TLC to work well:
1. Clean the remote regularly
- Wipe the buttons and screen with a damp cloth (don’t soak it).
- Clean the infrared emitter with a cotton swab.
2. Replace batteries annually
- Even if they seem fine, old batteries can corrode and damage the remote.
3. Clean the AC’s filters monthly
- Dirty filters reduce efficiency and can damage the AC.
- Rinse the filters with water and let them dry before reinstalling.
4. Check the AC’s sensor
- Wipe the sensor with a soft cloth to ensure accurate temperature readings.
Airwell Remote Settings Comparison Table
Here’s a quick reference for common Airwell remote models:
| Feature | Model A (Standard) | Model B (Premium) | Model C (Smart) |
|---|---|---|---|
| Cooling Modes | Cool, Fan, Dry, Auto | Cool, Heat, Fan, Dry, Auto | Cool, Heat, Fan, Dry, Auto, Turbo |
| Timer | On/Off (1-24h) | On/Off (1-24h) | On/Off (1-24h), Weekly Schedule |
| Sleep Mode | Yes | Yes | Yes, with Smart Adjustment |
| Eco Mode | No | Yes | Yes, with Energy Tracking |
| Turbo Mode | No | No | Yes |
| Swing Control | Horizontal | Horizontal & Vertical | Horizontal, Vertical, Auto |
Note: Features may vary by region and model year. Check your manual for specifics.
Conclusion
Mastering your Airwell air conditioner remote doesn’t have to be a headache. With a little practice, you’ll be using every feature like a pro. Remember to start with the basics—power, mode, and temperature—then explore advanced settings like timer and sleep mode. Keep your remote and AC clean, and don’t hesitate to reset them if something goes wrong.
The best part? Once you get the hang of it, you’ll save energy, stay comfortable, and avoid those frustrating “why won’t this work?” moments. Whether you’re cooling down on a hot summer day or warming up in winter, your Airwell remote is your best friend. So go ahead, press those buttons, and enjoy a perfectly climate-controlled home.
And if you ever feel stuck? Just take a deep breath, check the manual, or come back to this guide. You’ve got this!
Frequently Asked Questions
How do I pair my Airwell air conditioner remote?
To pair your Airwell air conditioner remote, ensure the unit is powered on and press and hold the “Mode” and “Fan Speed” buttons simultaneously for 3 seconds until the display blinks. The remote should now be synced with your Airwell AC unit.
Why isn’t my Airwell air conditioner remote working?
If your Airwell air conditioner remote isn’t working, first check the batteries and replace them if needed. Also, make sure there are no obstructions between the remote and the AC unit, as signal interference can prevent proper operation.
How do I reset the Airwell air conditioner remote control?
To reset your Airwell air conditioner remote control, remove the batteries, wait 30 seconds, then reinsert them. Press any button to reactivate the remote. This often resolves unresponsive or glitchy behavior.
Can I use a universal remote with my Airwell air conditioner?
Yes, many universal remotes are compatible with Airwell air conditioners. Check the universal remote’s manual for Airwell codes or use the auto-search function to find the correct setting for your model.
What do the symbols on my Airwell AC remote mean?
The symbols on your Airwell AC remote represent functions like cooling, heating, fan speed, and timer settings. Refer to your user manual for a detailed guide, or visit the Airwell support website for visual explanations of each icon.
How do I set the timer on my Airwell air conditioner remote?
To set the timer, press the “Timer” button on your Airwell air conditioner remote and use the up/down arrows to select the desired on or off time. Confirm by pressing “Timer” again—this helps save energy by automating your AC’s operation.

