
If your AC unit is blowing out warm air instead of cold, it’s likely due to a hole or leak in your copper refrigerant line – a common problem faced by homeowners during the warmer months. While it may seem like a daunting task, repairing a hole in a copper AC line is actually a relatively straightforward process that can be done with the right tools and a bit of know-how. Whether you’re dealing with a small puncture or a larger tear, repairing a hole in your copper AC line can be done quickly and easily, without the need for professional help.
By following a few simple steps, you can get your AC unit running back to normal and keep your home cool and comfortable all summer long. In this blog, we’ll give you a complete guide to repairing a hole in your copper AC line, starting with detecting the problem, the tools and materials you’ll need, and the proper steps to fix the issue. We’ll also give you some tips and tricks to help prevent future leaks, so you can keep your AC unit running smoothly for years to come.
So, let’s get started!
Understanding the Issue
If you’re experiencing cooling issues with your AC, it’s possible that the cause is a hole in the copper AC line. Thankfully, repairing a hole in the copper AC line is a relatively straightforward process that any DIYer can tackle at home. The first step is to locate the hole in the line, which can usually be done by inspecting the exposed areas of the line for visible damage or by using a leak detection kit.
Once you’ve located the hole, you’ll need to clean the area around it with a wire brush or sandpaper. Next, you’ll need to apply a copper patch to the hole using a soldering iron and flux. When you’re finished, be sure to test the repair by connecting the line to the AC and checking for leaks.
While repairing a hole in a copper AC line may seem intimidating at first, with a little bit of knowledge and the right tools, it’s a DIY repair that’s well within the reach of most homeowners.
Locating the Hole in the Line
When it comes to plumbing issues, one of the most frustrating problems is a leaky water line. Not only does it waste water and increase your utility bill, but it can also cause damage to your home if left unresolved. The first step in fixing this issue is locating the hole in the line.
This can be a tricky task, as the hole can be small and hard to spot. One way to identify the location of the hole is by checking for water stains or dampness on walls and ceilings near the affected area. Another method is to turn off the water supply and listen for the sound of dripping water.
Once you have located the hole, you can then take steps to repair it, such as patching it with a rubber patch or replacing the damaged section of the pipe. Don’t let a leaky water line cause any more damage – take action today to locate and fix the problem.
Assessing the Severity of the Damage
When it comes to assessing the severity of damage, it’s crucial to understand the issue at hand. Is it a small scratch or a major dent that will require significant repairs? The extent of the damage will determine the steps needed to fix the problem, so it’s essential to examine the damage closely. One way to do this is by taking photos or videos of the damage, which can help provide a clear visual of the issue.
Additionally, seeking professional help is always recommended, as a trained eye can spot even the smallest of damages and provide the best advice on how to proceed. Remember, neglecting even minor damage can lead to more significant issues down the line, so it’s best to take a proactive approach and fully understand the severity of the damage.
Preparation
If you’re dealing with a hole in your copper AC line, preparation is key to successfully repairing it. Before attempting any repairs, make sure the AC unit is turned off and the power source is disconnected. Next, use a wire brush or sandpaper to clean the area around the hole and remove any rust, debris, or oxidation.
Afterward, use a plastic or metal cutting tool to cut out the damaged portion of the copper line at least one inch away from the hole. Be sure to measure the diameter of the remaining line and note it down before proceeding to the next step. By taking the time to properly prepare the copper line before attempting to repair a hole, you’ll greatly increase the chances of the repair being successful.
Don’t rush into the repair process without taking the necessary precautions as this could cause further damage to the AC unit.
Gathering the Necessary Tools and Materials
To ensure a successful project, it is crucial to gather all the necessary tools and materials before beginning. This will not only save you time but also prevent any frustration that can arise from unexpected delays caused by lack of preparation. First, make a list of everything you will need based on the project requirements, and double-check it to ensure nothing is forgotten.
When selecting the tools, consider their quality rather than the price, as cheaper options may break or wear out quickly, leading to added replacement cost and time. Moreover, it is best to gather all the materials needed in one place, as this will make it easier to access them when required. It is advisable to think about any additional equipment they may need for the project as this can be essential to the project’s success.
Often, projects require the use of safety equipment, such as gloves, goggles, or masks. Before beginning, it is recommended to read the instructions on any unfamiliar tools or equipment to ensure they are used safely and effectively. By taking the time to prepare adequately, you can feel confident that your project will go smoothly and be completed to the highest standard, with all the necessary tools and materials at hand.
Cleaning the Affected Area
When dealing with a spill or stain, preparation is key when cleaning the affected area. Begin by identifying what type of spill or stain it is so you can use the appropriate cleaning solution or method. For example, a spill of red wine on a carpet may require different treatment than a muddy shoe print.
Gather all necessary cleaning supplies such as gloves, paper towels, and a cleaning solution. It’s important to read the labels on cleaning products to ensure that they’re safe for use on the affected surface. Before starting the cleaning process, remove any excess debris or liquid with a paper towel or damp cloth.
This will prevent the stain from spreading or setting into the surface. By taking the time to properly prepare and equip yourself, you’ll be able to tackle the cleaning process with confidence and maintain the cleanliness of your space. Remember, a little extra time and effort spent in preparation can save you a lot of hassle down the road.
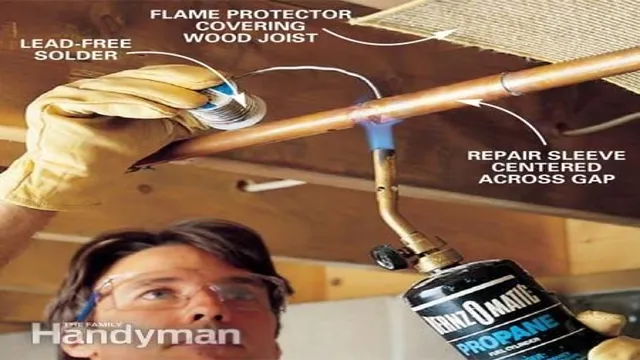
Repairing the Hole
If you need to repair a hole in your copper AC line, it’s important to take care of it as soon as possible to prevent further damage. First, you’ll need to determine the size and location of the hole, as this will affect the repair method you use. If it’s a small hole, you may be able to use a copper pipe repair clamp or epoxy to seal it.
For larger holes, you’ll need to patch the area with a piece of copper tubing and solder it in place. It’s important to use the correct tools and materials for the job, and to follow all safety precautions when working with copper and solder. With a little patience and the right techniques, you can easily repair a hole in your copper AC line and keep your system running smoothly.
Using a Compression Fitting to Seal the Hole
If you’re dealing with a hole in your plumbing pipe, you’re probably wondering what the best way to fix it is. Well, one option is to use a compression fitting to seal the hole. Compression fittings are great because they can be installed quickly and easily without the need for any special tools or skills.
All you need to do is slide the compression fitting onto the damaged area of the pipe and tighten the nut. The fitting will compress the pipe, creating a tight seal that will prevent any leaks. The key to successfully using a compression fitting is to make sure that you choose the right size for your pipe.
A fitting that is too small or too large won’t create a proper seal and could end up causing further damage. Once the fitting is in place, turn on the water and check for any leaks. If everything looks good, you’re all set! Compression fittings are a great solution for simple pipe repair jobs and can save you both time and money in the long run.
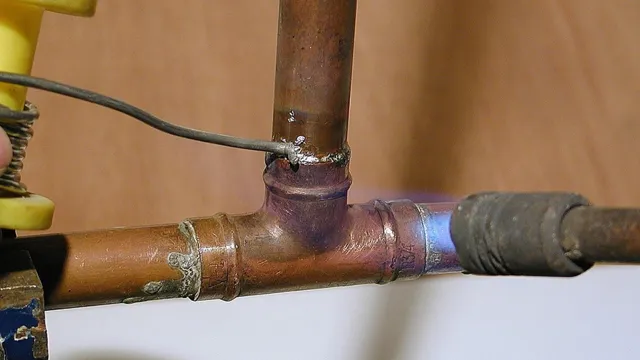
Soldering the Hole Shut
When it comes to repairing a hole in a circuit board, soldering is often the best solution. This involves melting a small amount of solder onto the damaged area, essentially “sealing” the hole shut and restoring electrical conductivity to the board. However, for those unfamiliar with soldering, the process can seem intimidating and difficult.
It’s important to make sure you have the appropriate safety equipment, such as goggles and gloves, and that you use a soldering iron with a fine tip to ensure precision. Once you have the equipment, apply a small amount of flux to the damaged area, which will help the solder flow more smoothly. Then, heat the soldering iron and gently touch the tip to the affected area, being careful not to apply too much pressure or overheating the board.
With some practice and patience, even those new to soldering can quickly become proficient at repairing damaged circuit boards.
Testing the Repaired Line
So, you’ve successfully repaired the hole in your copper AC line and you’re ready to test it out. Before turning the system back on, it’s essential to ensure the repair was done correctly to avoid any future problems. Start by checking the area around the repair for any signs of leaking or moisture.
If everything looks dry, it’s time to turn the system on and see how it works. Monitor the system’s performance and listen for any unusual sounds or noises. If there are no leaks, strange sounds, or issues with cooling, then your repair was successful! However, if you encounter any problems, don’t hesitate to seek professional help.
Remember, proper testing is crucial to avoid larger damages in the future- so make sure everything is working properly before considering the job done.
Conclusion
In conclusion, repairing a hole in a copper AC line is not as difficult as it may seem. With the right tools and a few simple steps, you can save yourself the headache and expense of replacing the entire line. You’ll need to cut out the damaged section, use a coupling or compression fitting to join the two ends, and solder the connection to ensure a reliable seal.
Just remember to take your time and follow safety precautions, and soon enough, your AC system will be humming along cool as a cucumber. Now, doesn’t that sound like a breeze?”
FAQs
What causes holes in copper AC lines?
Holes in copper AC lines can be caused by factors such as corrosion, physical damage, and wear and tear over time.
Can a hole in a copper AC line be fixed?
Yes, a hole in a copper AC line can be fixed using a specialized repair kit or by brazing a small piece of copper onto the damaged area.
How much does it cost to repair a hole in a copper AC line?
The cost to repair a hole in a copper AC line can vary depending on the location and size of the hole, but typically ranges from $150 to $500.
Can I repair a hole in a copper AC line myself?
While it is possible to repair a hole in a copper AC line, it is not recommended for individuals who are not experienced in HVAC repairs. It is best to hire a professional HVAC technician to ensure proper repair and safety.